
Track dynamic content with Google Analytics
The result you will get:
![]()
Learn how to track your dynamic content with Google Analytics:
Personalized content is great. With little effort, it increases conversion and engagement rates and can decrease bounce rates drastically. In this guide, we are going to show you an easy way to track dynamic content results using Google Analytics and Google Tag Manager.
This setup is divided into two steps:
Step 1: Create an Analytics event to track when a dynamic version is visible.
Step 2: Segment the Analytics reports to separate the data of users who saw the dynamic content version.
Let’s Get Started!
STEP 1: Create a Google Analytics event to track when a dynamic version is visible.
To see how dynamic content affects users engagement, we first need to set up an Analytics events collection every time a dynamic version is displayed. To do this, we will first add a class and an ID to each content version. We will then ask Google Analytics to collect an event every time an element with the class is visible in the user’s browser and to name the event according to the element’s ID.
In our example, we are going to name the class “ifsoEvent” and the IDs “versionA”, “VersionB,” etc. You can choose different names if you want to.

Adding Class and ID to the content’s versions
- On your WordPress dashboard, go to If-So > Triggers and select the trigger you want to track with Analytics
- Switch the content field to HTML mode
- Assign the class “ifsoEvent” to the wrapping element of the content. Analytics will track an event every time an element with this class is visible at the browser viewport
- Assign an ID to the wrapping element – The ID name you set here will be the name of the event on your Analytics reports.
* If you switch the editor to text mode and you don’t see any wrapping HTML element around your content, you’ll need to wrap the text in a P tag and assign the class and ID.
You can copy and paste the following code and just replace the text “your content” with your own content.
<div class="ifsoEvent" id="versionA">Your content</div>Hereinafter is an example showing how it should look like:

Setting up event tracking using Google Tag Manager
Creating a tag
- Go to your Google Tag Manager dashboard
- Navigate to Tags.
- Click New and name the tag “If-So tracking”
(The name is for your own convenience; you can choose a different name if you want). - Click Tag configurations
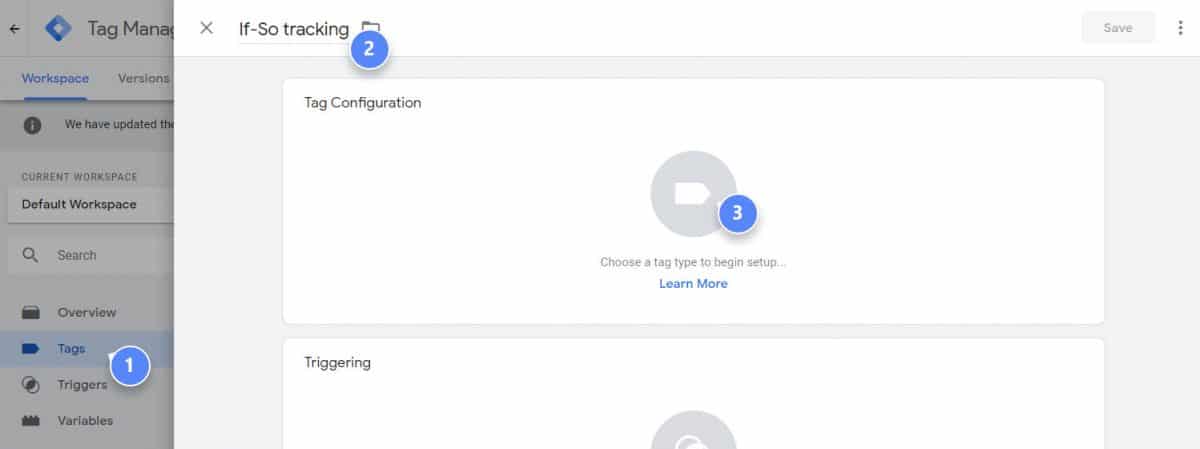
- Select Google Analytics – Universal Analytics as the tag type and set up the event parameters as follows:
– Track type: Event
– Category: ifso_tracking (you can choose a different name if you want to)
– Action: view
– Label: Click the ‘+’ sign and select {{Click ID}}.
– Non-interaction hit: TrueYour tag should look like this:
– Under Google Analytics settings select {{Google Analytics settings}}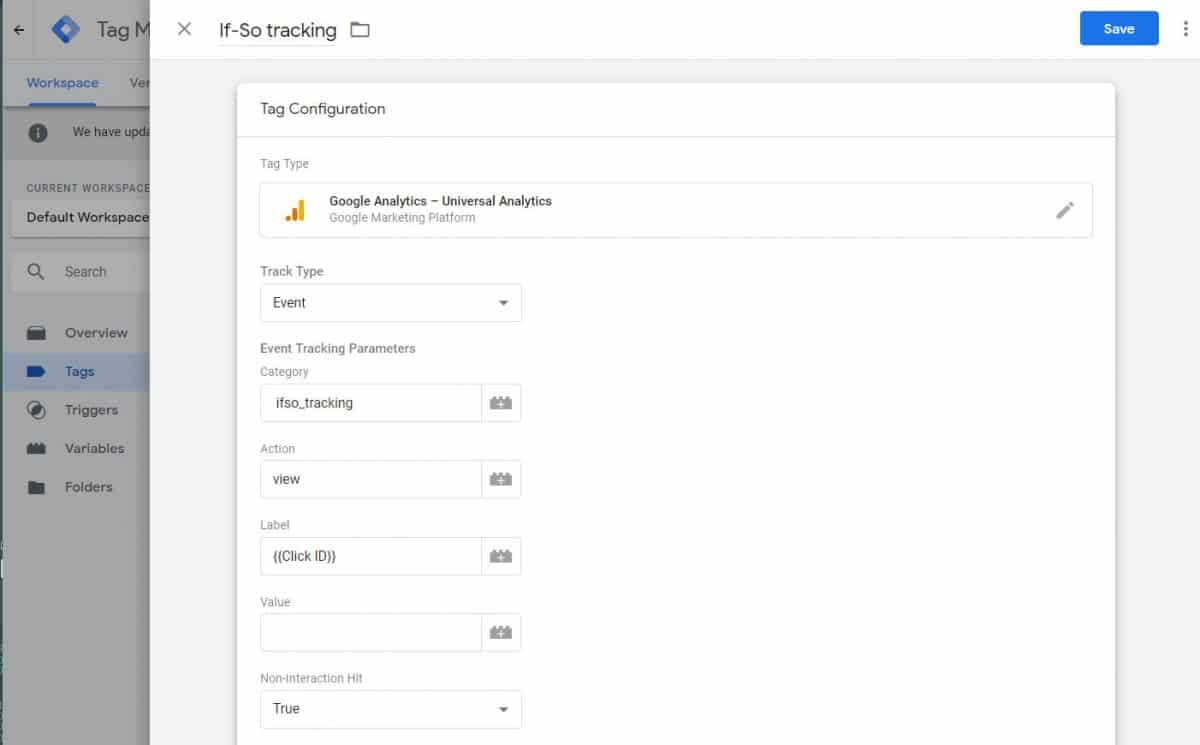


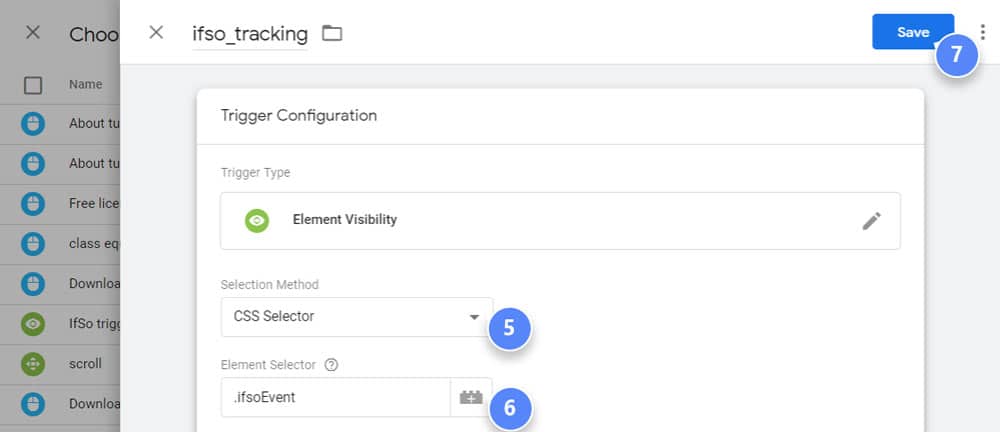
Creating the trigger
- Click the triggering box.
- Click the ‘+’ sign and name your trigger (we named ours ‘ifso_tracking’. You can choose a different name if you want; it’s for your own use only).
- Click Trigger Configuration.
- Choose Element Visibility as the trigger type.
- On the selection method field, select “CSS Selector”.
- 6. On the element selector field, type the class you have chosen for your element (We did it in the first step of this guide. In our example, we assigned the class “.ifsoEvent”). Make sure to write the class name with a dot at the beginning.
- Save! You should now hit the save button 3 times: on the trigger configurations window, the trigger container, and the tag window
- Click the submit button

Note that changes on Google Tag Manager are applied only after hitting the submit button!
That’s it! If you followed the steps above, the events should now appear on your Google Analytics reports.
Step 2 -Viewing results for each version on Google Analytics
After completing the steps above, events with different names will be collected every time a version is displayed. The events label is defined by the ID we assigned to the version. Next, we are going to create users segmentation on Google Analytics so that we can compare users’ behaviors based on the content version they saw.
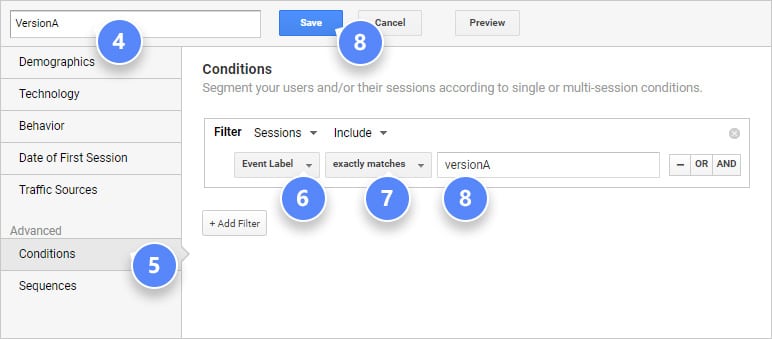
Segment users by the content version they saw:
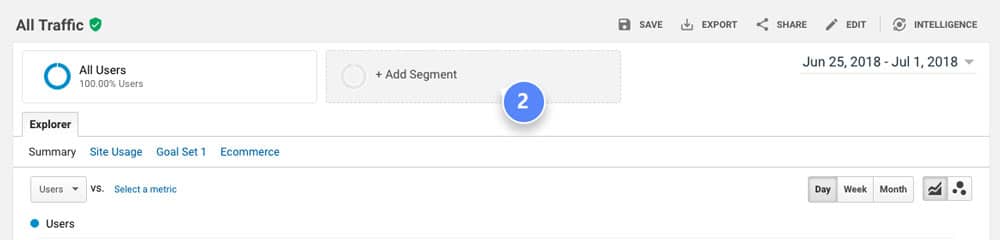
- On your Google Analytics account, go to the section you want to examine ( for example Behavior → Site Content → All Pages).
- On top of the Google Analytics, click +Add Segment.
- Click + New segment.
- Name the segment. For example, we named ours “versionA” but you can choose any other name; it’s for your own use only.
- At the side menu, click Conditions.
- Set up a filter as follows:
– In the first drop-down menu, choose event label.
– In the second, select exactly matches.
– In the type-form, insert the version ID (in our example – “versionA”). - Click Save


Voila! You’ve created a new segment that shows only users who watched version A. Repeat the last 7 steps to create segments for other content versions. Now you can track dynamic content across your entire website. Watch your conversion rates and ROI increase!