Audiences (Segments)
In this article: About the Audiences in If-So | Creating a New Audience | How to Add and Remove Users from a Audiences | The Audiences/Segment Condition
If-So allows you to Segment users into audiences based on the dynamic version displayed to them or the pages they visited on your site. You can then create an “Audiences” condition to display dynamic content to users who are part of the Audience.
What is the “Audiences” condition?
The “Audiences” condition allows you to pre-define audience/segments of users so that you can display audience-based content. Adding or removing users from these audiences is done based on the dynamic versions the user has seen.
Example:
- If a user arrives at the site from a Facebook Campaign targeted to women only, you can create an audience called “Females” and add her to the audience. You can then set another trigger placed in another location on your website and set an audiences=female condition to display content targeted to women.
How to Set Up Audiences-Based Content
Setting up audiences-based content requires three simple steps:
- Create the audience/segment
- Set up the conditions to add (or remove) users from the audience
- Set up audience-based content
Step 1: Creating a new audience
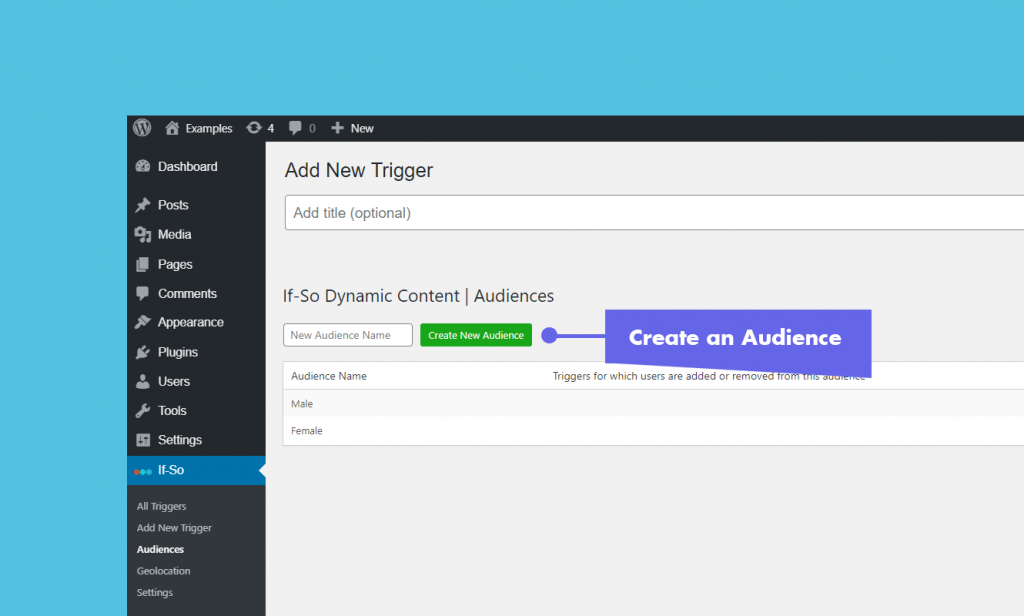
- On your WordPress dashboard, go to “If>So → Audiences“
- Enter the desired name for your new audience.
- Click “Create New Audience”
- Once the audience is created, its name will be displayed in a list.
Step 2: Adding (or removing) users from an audience
If-So provides several methods to add or remove users from an audience:
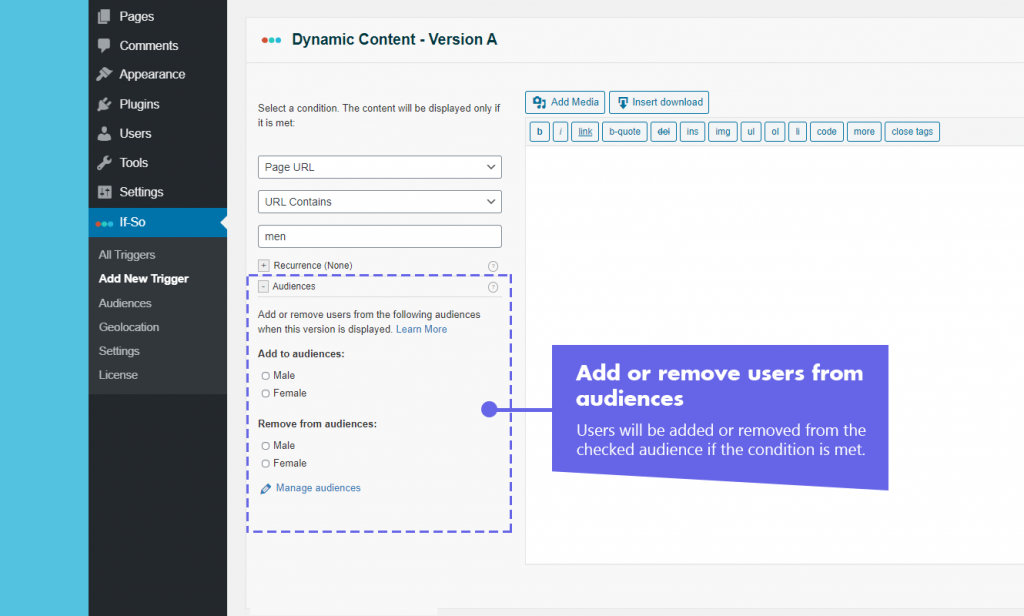
- When a condition is met: This option can be found below the condition in both triggers and conditional Gutenberg and Elementor widgets.
- Using a shortcode: Users are added or removed when they visit a page with the corresponding shortcode.
- Self-selection form: Create a form that enables users to add themselves to an audience, such as selecting their interests.
Add or remove users from an audience when a condition is met
Specify when to add or remove users from an audience by clicking on the “Audience” option located below the dynamic versions’ conditions.

Add or remove users from an audience using a shortcode
A second way to add or remove users from an audience is using one (or more) of the shortcodes below. The add/remove action will take place when the user loads a page with the shortcode.
Add a user to an audience
[ifso-audience type='add' audience='YOUR-AUDIENCE-NAME']Remove a user from an audience
[ifso-audience type='remove' audience='YOUR-AUDIENCE-NAME']*Make sure to replace “YOUR-AUDIENCE-NAME” with your audience name. The value is case-sensitive.
Add or remove users from an audience based on the user’s selection
You can utilize the User Self-selection Form extension to showcase dynamic content according to the user’s preferences. Check out the User Self-selection Form extension.
Step 3: Setting up audience-based content
*Elementor or Gutenberg user? This condition can be used to set up a conditional element or block (Learn more: Gutenberg | Elementor).
- On your WordPress dashboard, go to “If>So → Add New Trigger.
- Click “Select a condition” and select “Audiences.“
- Select an operator (“Audience is” or “Audience is not”)
- In the content field, specify the content to be displayed if a user is part of the audience.
- In the default content field, specify the content to be displayed if the user is not part of the audience.
- Click “Publish” and paste the shortcode generated by If-So to your website.
Screenshots


FAQs
- Does If-So work with server-side and WordPress caching solutions?
Yes.
Whether you are using a caching plugin or server caching, you can navigate to the plugin settings and enable the “Page Caching Compatibility” option.
With the option enabled, dynamic triggers will be rendered in a separate request that will take place after the loading of the cached version.
- Is it possible to set up conditional redirects (redirecting users to different pages based on conditions)?
Yes, you can set up conditional redirects based on any If-So condition.