2 simple ways to add custom CSS to WordPress websites
In this guide, we will cover two options for adding CSS to your WordPress website:
1. Inline CSS – to apply styling to specific pages or posts.
2. Adding CSS to the style.css file – to apply the changes to your entire website.
Option 1: Add custom CSS to WordPress pages using inline CSS
- If you are using a page builder such as Gutenberg, Elementor, Divi, or any other, you can add inline CSS by accessing the page or post editor and adding an HTML block, element, or module.
- Within the HTML block or element, you can add your CSS code wrapped in style tags.
For example:
<style>
  .my-element {
    background-color: red;
  }
</style>
Keep in mind that any CSS added inline will be applied only to the specific page or post that you are editing and will not affect the overall styling of your website.
Option 2: Add custom CSS to WordPress websites by editing the style.css file
To add CSS that will be applied to all pages of your website, you can use the style.css file in your theme or child theme.
A child theme is a theme that inherits the functionality of another theme, called the parent theme. It is considered the best practice for customizing a WordPress website because it allows you to keep your modifications separate from the parent theme. This is important because any changes you make to the parent theme’s files will be lost when the theme is updated. Learn more about child themes.
There are two ways to access and edit this file:
1. Using the file editor on the WordPress Dashboard:
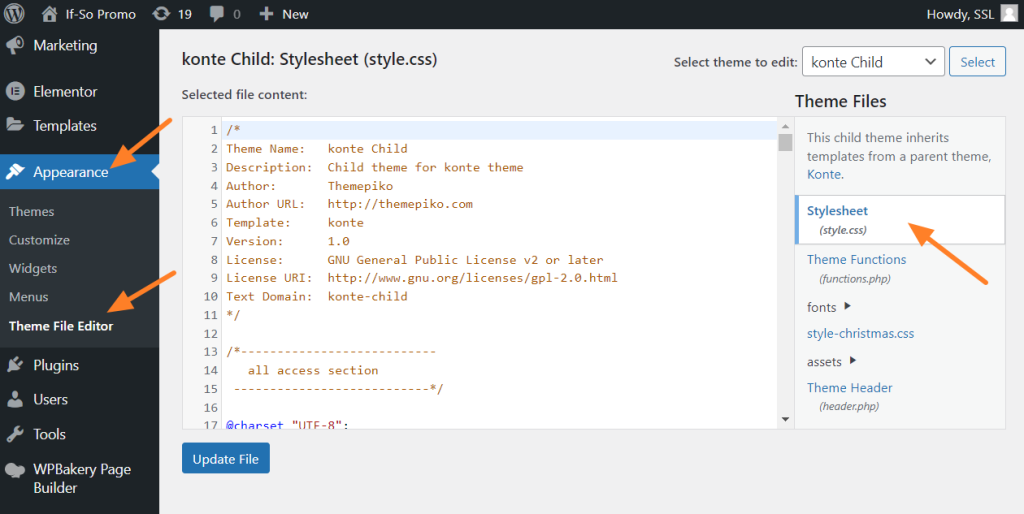
- From your dashboard, go to Appearance > Theme Editor.
- On the right-hand side, you should see a list of theme files. Click on style.css to open it in the editor.
- Scroll to the bottom of the file and add your CSS code.
- Click the “Update File” button to save your changes.

2. Using FTP:
To add custom CSS to WordPress websites using an FTP client (such as FileZilla or WinSCP), you must connect to your website’s server and edit the style.css file directly. Simply follow the steps below:
- Connect to your server.
- Navigate to the theme folder.
- Open the style.css file in a text editor.
Add your CSS code to the bottom of the file and save it.
Troubleshooting
Cache
If you’ve made changes to your WordPress site’s custom CSS but they aren’t appearing, there’s a good chance it’s due to cache. Learn more about cache.
First try to “hard refresh” your browser (on Windows: Ctrl + F5, on Mac: Shift + Reload button).
Using a caching plugin? Your website is serving resources from temporary storage to improve speed and reduce resource usage. To fix this issue, try clearing your WordPress cache or temporarily disabling your caching plugin.
Misspelled CSS syntax
Spelling mistakes can prevent your changes from showing up properly. If you’ve checked for caching issues and still can’t see your changes, a CSS validator can be helpful. CSS validators allow you to paste your CSS and will highlight any errors or typos, along with the line where they appear. This can help you quickly identify and fix any mistakes you might have made.
FAQ
What is CSS?
CSS (Cascading Style Sheets) is a stylesheet language used to describe the look and formatting of a website’s content. CSS is used to define the layout, colors, fonts, and other styles of a website.
In WordPress, the main CSS file is typically style.css. This file is used to define the styles for your theme and controls the appearance of your website.
The style.css file is usually located in the root directory of your theme and can be accessed and edited from the WordPress dashboard by going to Appearance > Theme Editor.