DEAL ENDS IN:

SPRING SALE!

UP TO 35% OFF!

GET IT NOW

Everything you need to know about Geolocation API

The Geolocation API is one of two methods used to detect the user’s location and provide a personalized content experience:

  1. The Geolocation API
  2. IP-to-location

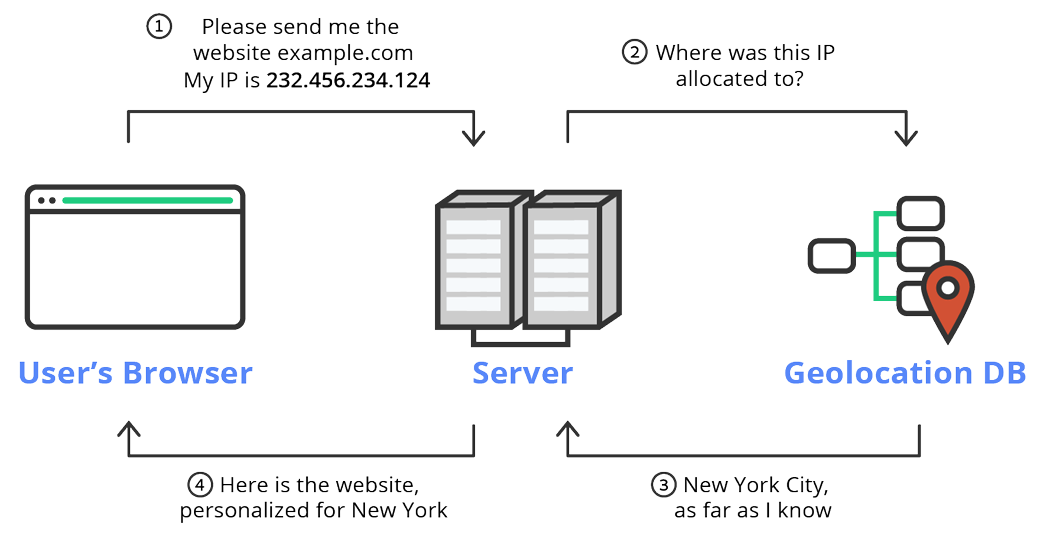
The Geolocation API figures out where the user is based on the data it gathers from their web browser. In contrast, IP-to-location works by checking the user’s IP address against a dedicated database to find their location.

While IP-to-location works by cross-referencing the user’s IP address with a dedicated database, the Geolocation API relies on browser-based location data, integrating multiple sources of information to accurately determine the user’s location, even down to identifying the user’s address.

In this article, we’ll discuss what the geolocation API is, its advantages and disadvantages, how it compares with the IP-to-location alternative, and how you can integrate both methods to leverage the benefits of both.

What is the Geolocation API?

The geolocation API is a browser API used for accessing a user’s location and geographic information.

It is integrated into a website or app using either programming languages such as HTML, Javascript, Python, etc., or through the user’s device.

The API captures the coordinates (latitude and longitude) of the user to identify their location. It gains this information through an estimation of multiple sources including networking protocols, time of day, Wi-Fi nodes, and cellular towers.

Although this article focuses on web browsers, it’s important to mention the power of this API for mobile apps as well.

By comparing the coordinates received from the Geolocation API with a dedicated database that matches the coordinates to location names, you can personalize web content based on a visitor’s country, city, state, or continent.

This provides a range of benefits to site owners such as:

  • Give up-to-date information on local events and promotions
  • Show accurate currency and delivery options to online buyers
  • Direct visitors to the nearest branch of your company
  • Display personalized messages to visitors based on their location
  • Diversify your customer base by targeting local trends and markets

The above benefits of the geolocation API can be used to enhance the customer experience by personalizing the content based on their location

Below we look at some specific use cases and examples of how site owners can take full advantage of geolocation tracking.

Geolocation API Examples & Use Cases

Both the IP-to-location service and geolocation API can create a personalized content experience in various ways. Once a user grants access to their location, the geolocation API’s reliability and high accuracy enable multiple ways to deliver personalized content.

Show Accurate Product Recommendations

Online e-commerce stores can use the geolocation API to show products relevant to each visitor based on their location.

This can lead to a personalized shopping experience allowing customers to shop in their local currency with their local debit/credit card; increasing overall sales.

Give Directions to the Nearest Branch

Getting an accurate location of a user can help identify nearby store locations and retail chains of a company. This can be used to show customers a map featuring the closest branch of a business to direct them to your store.

This can increase leads and boost conversions as customers who’d want to interact with the product (e.g. trying on a clothing item) can do so which increases the likelihood of a person buying the product.

Provide Information on Local Events and Promotion

Hosting events can be a great way to gain traction. Some events like Independence Day may vary from country to country.

For example, American Independence Day is celebrated on the 4th of July whereas Independence Day in Pakistan is celebrated on the 14th of August.

If you’re planning on hosting a promotional Independence Day sale, it wouldn’t make sense to show the same message to all your visitors for this reason.

The geolocation API can be used to dynamically serve location-specific promotions, so your visitors are getting accurate information about your local offers enabling them to engage better with your brand.

Build Brand Awareness

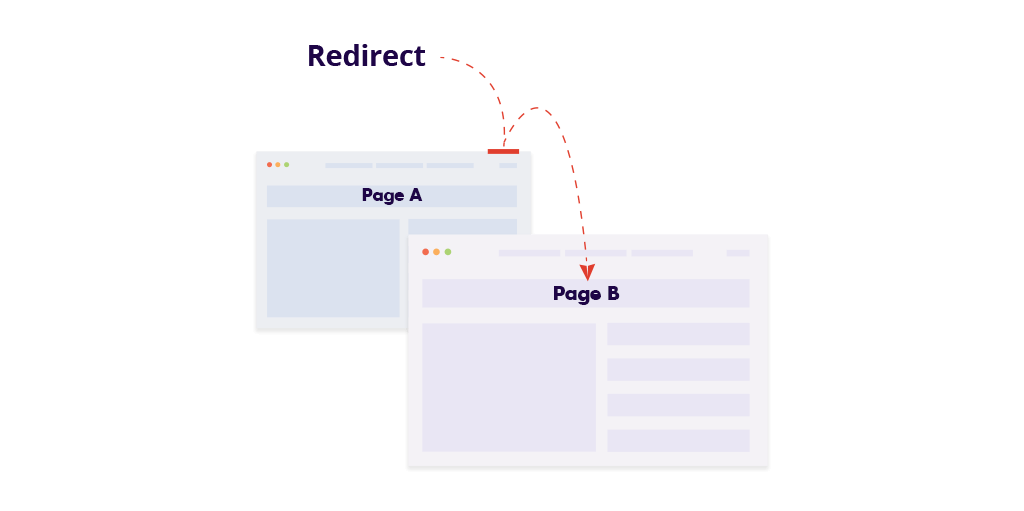
Customers may not be aware that a business operates in its current location. Thus, knowing the user’s location can help you direct visitors to the correct version of your site.

This will allow you to improve user engagement and experience on your site. As the local version will be personalized to them – displaying their currency, delivery address, and language – it can build brand awareness and improve customer loyalty while capturing the local market.

Security & Privacy Concerns

A customer’s geolocation data is vital and sensitive information. So, if you choose to use this data you’ll be responsible for maintaining its privacy and protecting it from being used to exploit customers and de-anonymize them.

Due to the above concern, customers demand a more transparent web experience with companies. Since the geolocation API gives you access to sensitive data, businesses must follow the below best practices to ensure a transparent customer experience and establish trust with their website visitors.

Getting the User’s Consent to Track User Location

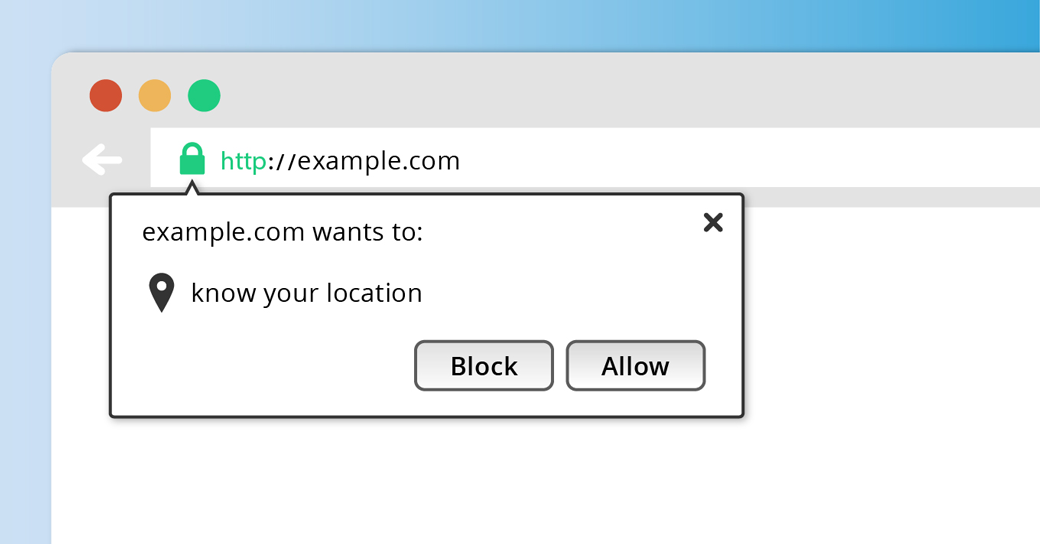
The Geolocation API is a powerful feature that requires express permission from an end-user before any location data is shared with a web application.

Permission is typically granted through browser notification, providing users with the option to allow or block the browser to share their location with the site.

Different browsers behave differently and manage permissions in various ways. For instance, Firefox provides a checkbox that enables users to ‘Remember their decision,’ while Google Chrome automatically remembers the user’s choice for subsequent visits. Chrome may also cease displaying the location-sharing notification on its own if it detects that the user frequently declines access.

Geolocation API - Google Chrome share location notification

Informing Users How the Data Will be Used

When prompting users to click on a CTA button or link, it’s advised to explicitly state why a website needs to access a user’s location or notify them that the service they’re using will need access to their location.

For example, if a visitor wants to know about stores near them, it’s recommended to include a clear message such as “This service requires location access to display nearby areas”””.

Site owners should also notify users how they plan on using the user’s location data, such as to display relevant product recommendations or serve targeted ads.

Browser Support for Geolocation API

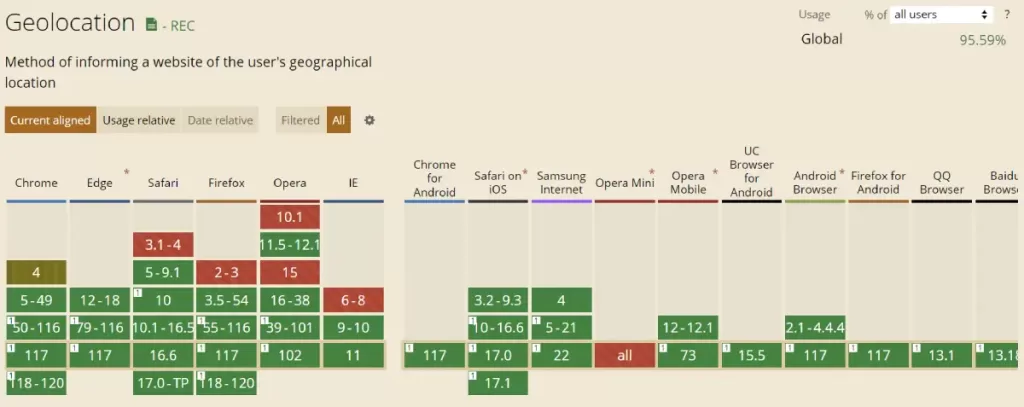
The Geolocation API works with all web browsers and supports earlier and later versions. However, mobile web browsers still have limited support despite the majority of the popular browsers supporting them.

Here’s a table summarizing browser support for the geolocation API from caniuse.

Browser Support for Geolocation API

Is Geolocation API the Best Way to Serve Personalized Content to Visitors?

Till now you should have a good idea of what the Geolocation API is, ways to use it, and the benefits it provides.

Despite its many benefits, it may not be the ideal solution for every website owner. There are a few reasons why this might be the case.

  1. Since the geolocation API requires some technical knowledge in programming, you might have to hire a developer to implement it on your site and handle errors. This can increase operational costs.
  2. Many people aren’t comfortable sharing their location with company websites. This leads to many people refusing to give access to their location, leaving the benefits of geolocation void.
  3. Since the geolocation API requires the user’s permission to access their location, you cannot use it to display location-based content immediately when the user visits the site. If you wish to provide geotargeted content, you will need to refresh the page after obtaining the user’s approval.

Due to the above concerns, many site owners may not be able to take full advantage of the geolocation API. Fortunately, there’s an alternative solution that, when used together with the geolocation API, can address the aforementioned issues: IP-to-location.

IP-to-location – An Alternative to the Geolocation API

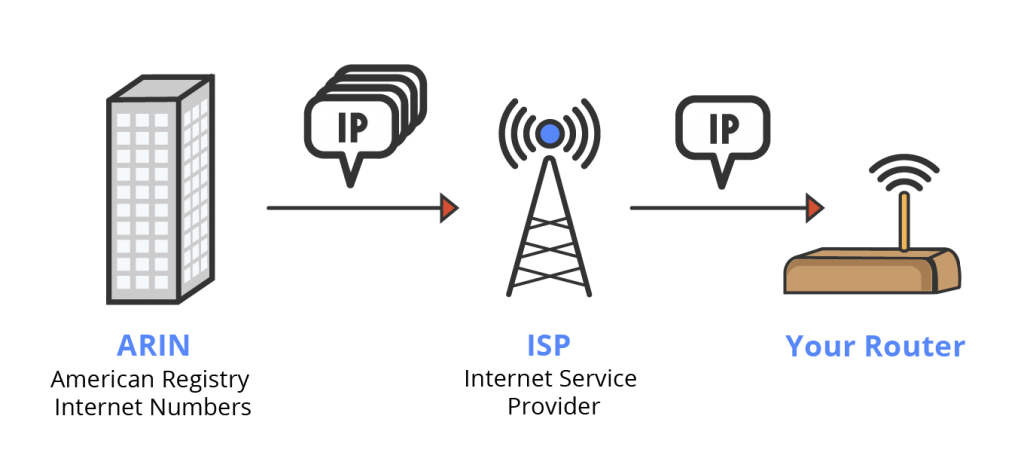
IP-to-location also known as GeoIP or IP Based Geolocation, is a way of finding a user’s location with their IP address.

To implement IP-to-location tracking you would need the IP address of the user (which can be obtained with PHP) and a geolocation lookup tool.

The geolocation tool will search through public databases and identify the contact and records of the IP address. This information will enable you to locate the user.

For WordPress users, the process is far easier.

In WordPress, you have access to location-based content plugins that offer the option to create location-based content within minutes, with no coding required.

How to Use IP-to-Location to Serve Personalized Content

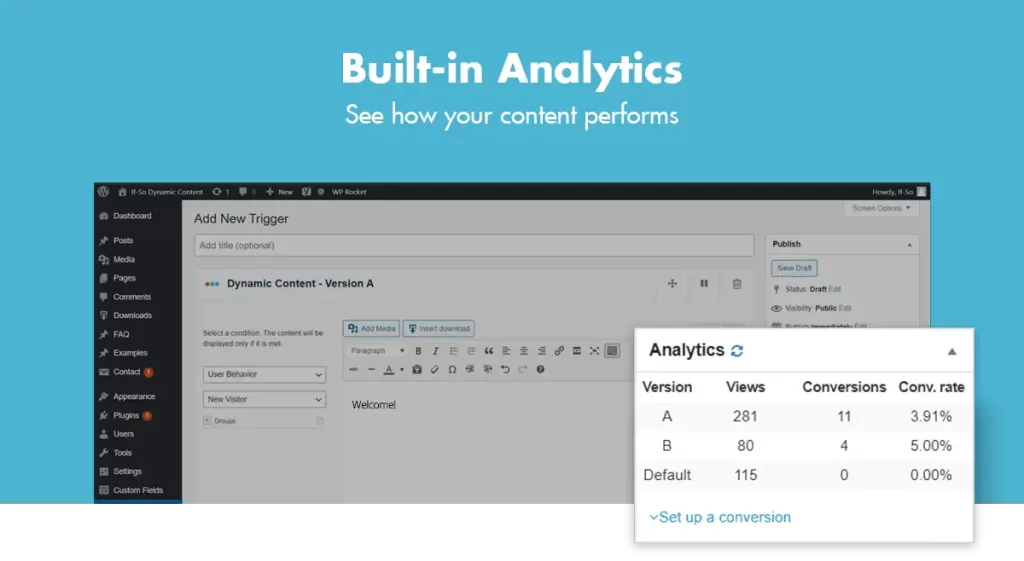
To start implementing IP-to-location for your website today, you can download the If-So plugin.

The If-So plugin quickly sets up your website to start serving personalized content dynamically on your WordPress website.

Setting up is easy and requires just 1-2 mins.

Before setting up geolocation, you’d have to download the If-So plugin. You can do this by going to your WordPress dashboard and on the left-hand toolbar clicking on “Plugins”. On the top, go to “Add New” and search for the If-So plugin. After locating it, download and activate it.

Once you’ve downloaded the plugin, follow the below steps to apply the IP-to-location service to your website:

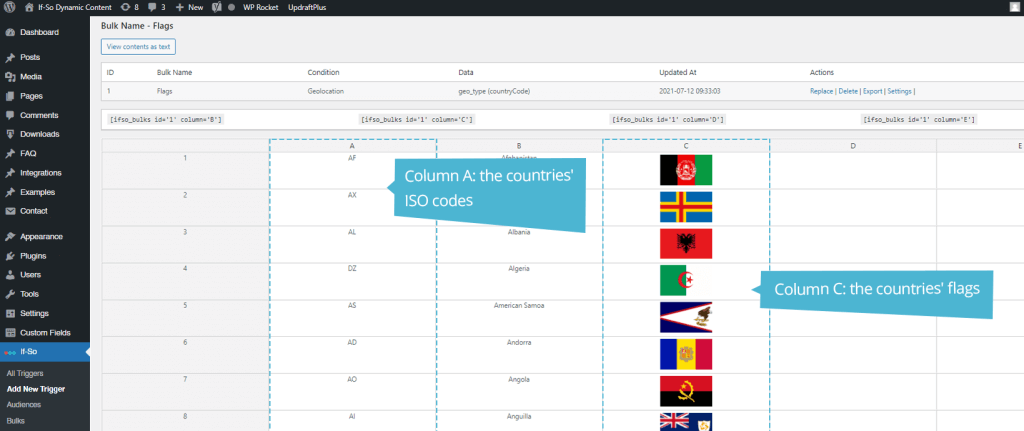
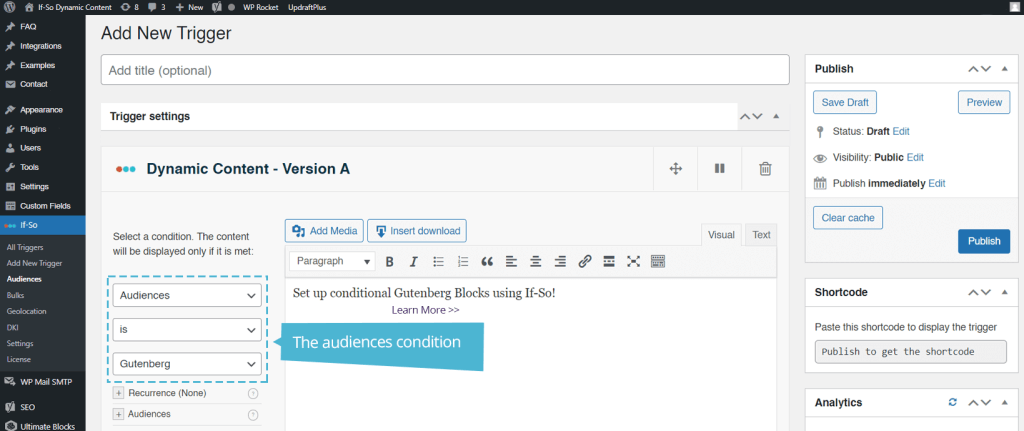
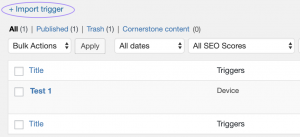
  1. On your WordPress dashboard, go to “If-So → Add New Trigger”.
  2. Click on “Select a condition” and select “Geolocation“.
  3. Start typing a continent, country, state, or city name and use the autocomplete list to select a location. You can choose as many locations as you like. Press the “x” button to remove an entry from the chosen targeted locations.
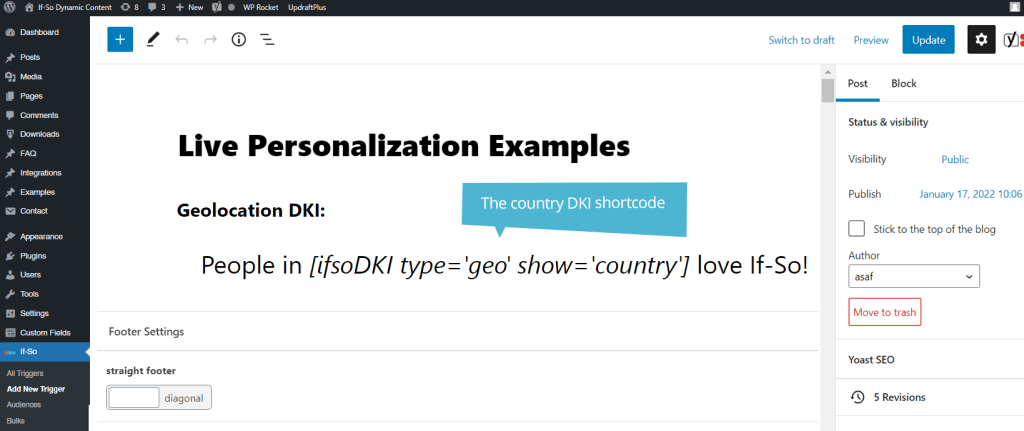
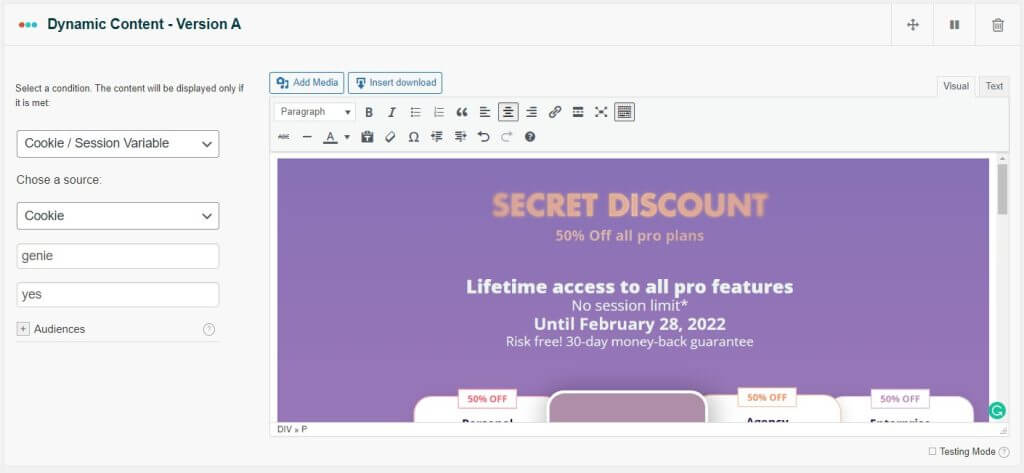
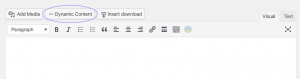
  4. In the content field, type the content to be displayed if the visitors’ location matches your criteria.
  5. In the default content field, type the content to be displayed if the visitors’ location does not match your targeting (this is optional and can be left blank).
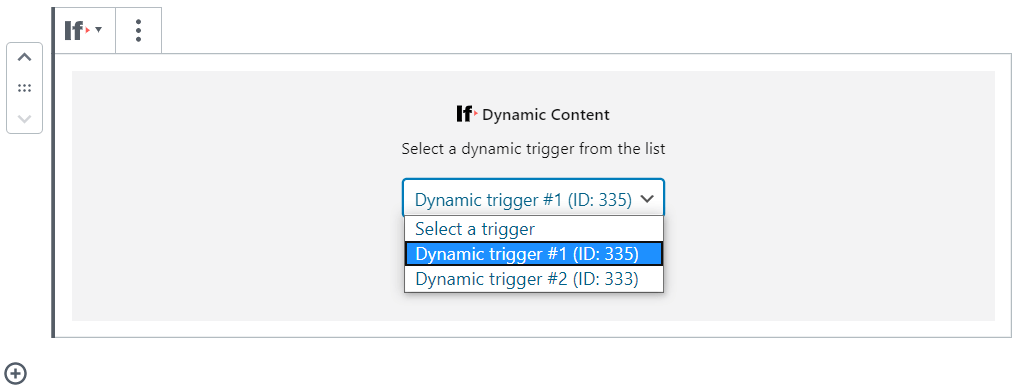
  6. Press “Publish” and paste the shortcode generated by If-So on your website wherever you want it to be.

Differences Between IP-to-Location and Geolocation API

The below table summarizes the differences between IP-to-Location and Geolocation API features:

IP-to-LocationGeolocation API
Does not require user permissionRequires user permission
Uses IP address to identify a user’s locationUses IP address, cellular triangulation, Wi-Fi nodes, and GPS to access accurate geographical data of a user
Only shows the approximate user locationShows the exact location of the user
Accuracy varies based on the estimated country, state, or city of the userHighly accurate results. Usualy able to pinpoint the exact location of the street lane and house

Key Takeaways

This article highlighted what geolocation API is and some of its uses to serve personalized content based on a user’s location.

Location-specific content can improve customer experience, and user engagement and reduce bounce rates. But, geolocation API has some drawbacks mainly due to privacy concerns and high maintenance costs.

For this reason, the ideal option is to use both the geolocation API and an IP-to-location service at the same time.

An IP-to-location gains access to a user’s location with their IP address without needing the user’s permission. This gives site owners the approximate location of a user to display location-specific content.

To get started with a comprehensive solution that provides both a geolocation API and IP-to-location services, you can use the If-So WordPress plugin today for free. No coding is required. Click here to learn more.
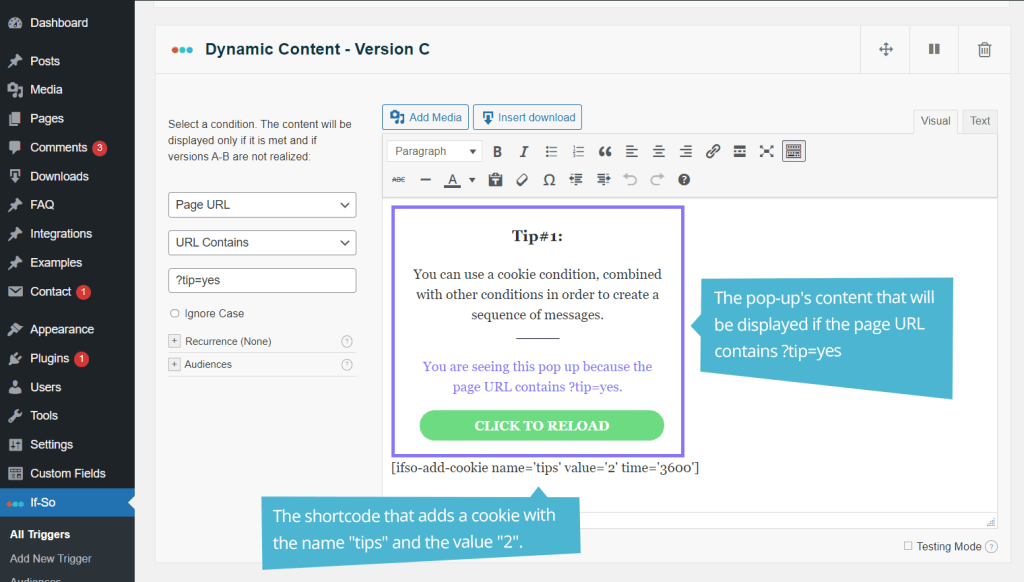
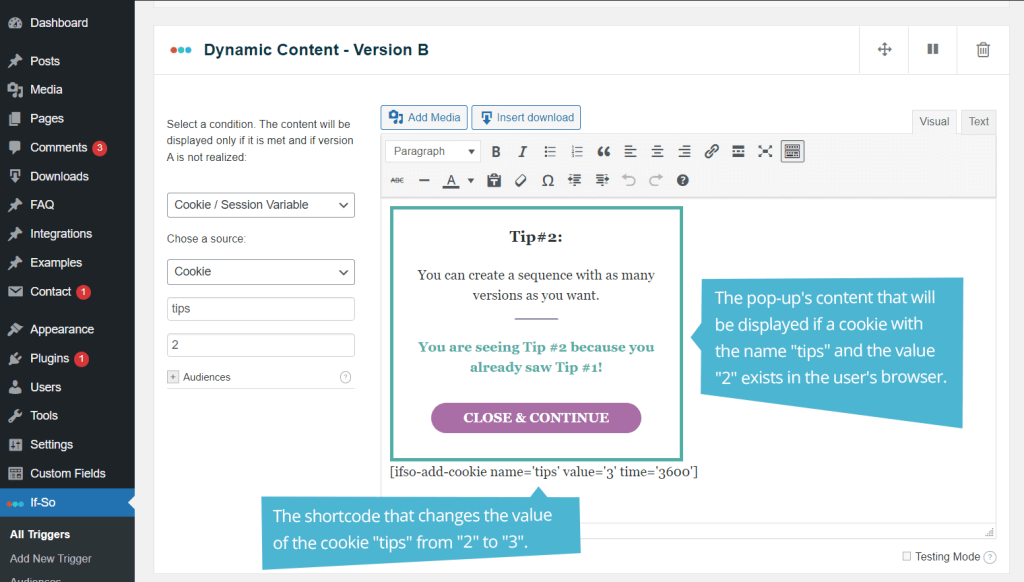
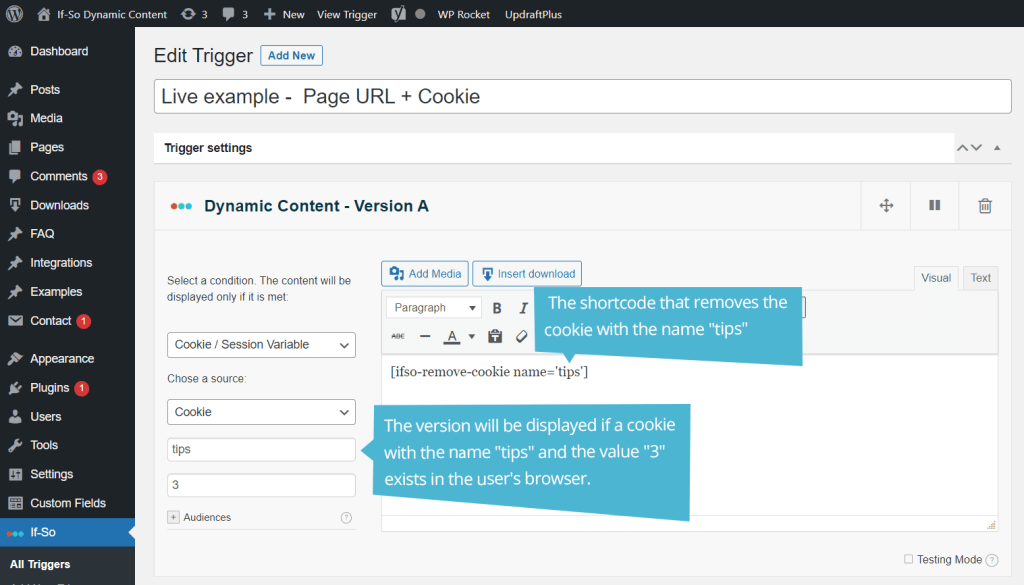
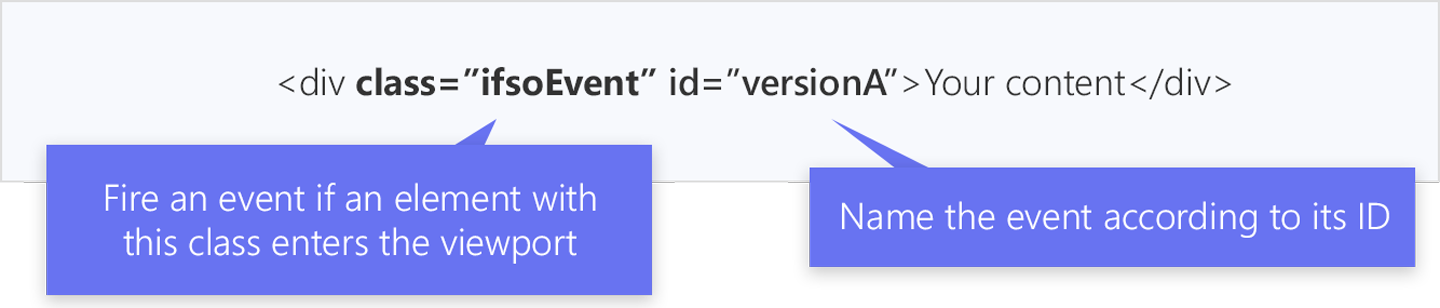
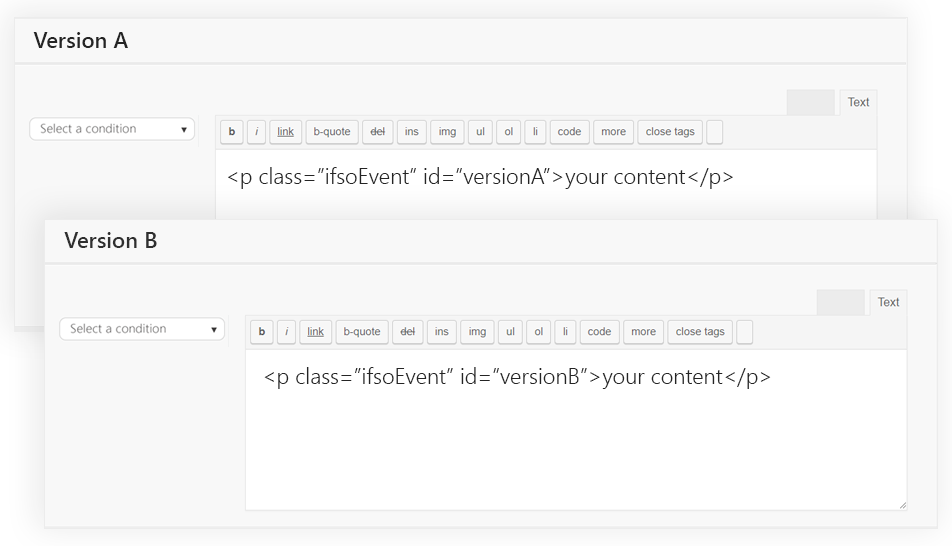
Jotform Conditional Content: 3 Ways for Crafting Personalized User Journeys

Introduction

Jotform has earned widespread popularity as a versatile platform for form creation. Among its numerous advantages, Jotform provides a seamless user experience. By integrating If-So Dynamic Content with this powerful tool, you can segment users into specific audiences and display dynamic content based on their responses.

The best part? No coding is required, and the dynamic content can be showcased across all pages of your site, not just limited to the thank-you page.

About Jotform

Jotform is a powerful online form builder that allows users to create customized, user-friendly forms for a variety of purposes. From simple contact forms to complex surveys and registration forms, Jotform offers a range of features that make form creation a breeze. Users can design forms with ease, collect data securely, and analyze responses efficiently.

Jotform conditional content: enhancing the user experience based on the user responses

Whether you’re new to If-So or a seasoned user, you’ll find valuable insights and techniques to take your website’s user experience to the next level.

The options showcased below all rely on Jotform’s ability to conditionally change the Thank You Page URL.

In brief, on the Jotform side, the concept involves transferring relevant responses using query parameters to the Thank You Page URL. If-So will then take over and perform its magic based on those parameters and their values.

  1. Displaying Dynamic Content Based on User Responses

    If-So offers various methods for showing conditional content based on URL parameters. All you need to do is create a trigger with a “Page URL Contains” condition and define the content to display when the condition is met. You can use any parameter from the URL as the basis for this condition.

    For instance: If: > Page URL > Contains > ?gender=male ; Then: Your Dynamic Content…

    This option is compatible with every page builder. If you’re using Elementor or Gutenberg, you can set the condition at the Element or Block level.

    More about the Page URL condition
  2. Display the user’s name using a shortcode

    Jotform’s conditional content capabilities already allow you to display the user’s name on the thank-you page. If-So improves upon this feature by ‘remembering’ the user’s name and enabling you to display it while the user continues to browse the site. This simple yet effective touch adds a personal connection, making users feel valued. Whether it’s a warm greeting or a personalized message, using their name enhances engagement and builds rapport.

    Discover how to display the user’s name using If-So’s query string DKI shortcode.

  3. Customizing website design based on user responses

    Taking personalization to the next level, you can use If-So Dynamic Content to alter the entire design or layout of your website based on user responses from Jotform. This level of customization allows you to create unique user experiences tailored to each visitor’s preferences.

    For instance, if a user indicates a preference for a particular style, color scheme, or content layout in a Jotform, you can use If-So to adapt your website’s design accordingly. This not only makes the user feel more at home on your site but also increases the likelihood of them engaging with and converting on your content.

    Learn more about how to set up conditional CSS using If-So

In conclusion, Jotform is an excellent tool for creating online forms, and its functionality can be elevated with If-So Dynamic Content. By segmenting your audience based on their answers, displaying dynamic content across all pages, and enhancing user engagement, you can unlock the full potential of your Jotform conditional content and provide an exceptional online experience for your audience.

So, why wait? Start using If-So Dynamic Content to take your Jotform to the next level and delight your users like never before.

3 Powerful Ways to Reduce Bounce Rate Using If-So in Just 24 Hours!


You have nothing to lose. Don’t give up on any visitor without putting up a fight

Here are two key points to consider as you move forward:

  1. You have nothing to lose: The visitor has arrived at your website for a certain purpose. If they leave without completing the desired action, they will ultimately go to your competitors.
  2. Designing and building the website, writing content, maintaining it, SEO, advertising, etc. – You have invested a significant amount of time, effort, and money to ensure that users arrive at your site. Don’t give up on any visitor without a fight.

What is Bounce Rate?

Bounce rate is an online marketing metric that refers to the percentage of visitors who land on one page of your website and leave without viewing any other pages.

According to Google, Bounce Rate is single-page sessions divided by all sessions, or the percentage of all sessions on your site in which users viewed only a single page and triggered only a single request to the Analytics server.

Practical reasons – why you should care about bounce rate

  1. More Conversions: The more pages a user visits on your site, the higher the chance of persuading them to take the desired actions.

  2. Search Engine Optimization (SEO): A lower bounce rate can potentially improve your website’s search engine rankings since it signals to search engines that your content is valuable and engaging.

  3. Ad Campaigns Price per Click: A lower bounce rate indicates higher user engagement and a more positive user experience, which can lead to a higher score, resulting in better ad positions at a lower cost per click.

3 ways to reduce Bounce Rate using If-So

#1 A conditional pop-up featuring a valuable offer

Capture visitors’ attention and prevent them from leaving by presenting a pop-up that offers something valuable.

It doesn’t have to be a discount. It could be a free resource, a recommendation to visit another page that they can benefit from, or exclusive content.

You don’t have to display it to all users. With If-So, you can utilize its conditions to choose which users will see the pop-up and determine which version of the pop-up they receive.

For example:

  • Create a pop-up with a message in the user’s native language.
  • Offer a special discount to specific users, such as those in countries experiencing higher-than-average bounce rates or low conversion rates.
  • Display the pop-up exclusively to users who arrive from your PPC campaign or any other marketing channel.

#2 A floating welcome message

Establish a welcoming atmosphere specifically designed for first-time users.

Maximize the impact of the message by providing guidance to visitors on the next step you expect them to take, such as watching an introduction video or visiting a specific page.

To enhance its effectiveness further, customize the welcome message to be displayed in the user’s native language. This personalized touch establishes a connection with visitors, encouraging them to prolong their stay on your site.

#3 Generate a sense of urgency using timers

Trigger the user’s fear of missing out by displaying a conditional countdown.

This special offer ends in:

Utilize If-So’s conditional capabilities to create a limited-time promotion that activates when the visitor first arrives on the site.

Not interested in offering a discount? Even implementing a countdown to the business opening hours can generate a sense of urgency and effectively reduce the bounce rate.

There’s more to explore

Delve deeper into your Analytics reports and identify pages, audiences, or scenarios where users commonly exit your site.

Utilize If-So to create customized solutions tailored to those specific situations. Whether it’s a compelling value proposition or an irresistible call-to-action, If-So can assist you in addressing those pain points and engaging your users in a manner that keeps them captivated.

See results in no time

מערכת סטטיסטיקות לניטור תוכן דינאמי

With If-So’s built-in stats system, you can effortlessly track the effectiveness of your efforts.

Gain insights into the performance of each version of dynamic content, including the number of times it was displayed and the resulting conversions.

This data-driven approach empowers you to make informed decisions and continuously optimize your content for enhanced engagement.

Get inspired

Explore our examples page, where you’ll find a variety of real-life implementations showcasing the versatility of If-So’s dynamic content capabilities.

When you see how simple it is, you won’t understand how you didn’t do it before

Inspiring Examples: 5 Dynamic Content Strategies We Use on Our Site

#1 Provide Italian-speaking users with the opportunity to learn about our product in their native language

Content is visible to:  Users who are located in Italian-speaking countries or who have Italian set as one of their browser languages.

Impara a usare questa funzionalità con Alessandro Epis

introduzione contenuti dinamici con Elementor esempi

What and why: Using the browser language and geolocation conditions, we display a message to Italian-speaking users suggesting that they can watch a video about our Elementor Integration in Italian.

The video was created by one of our Italian affiliates. We enjoy both higher conversion rates and the motivation of content creators to create content about our product in different languages.

See it live on our site

#2 Improve the conversion rate and quality score of keywords in our Google Ads Campaign

Content is visible to:  Users who Google for keywords containing “Geotargeting” and arriving from our Google Ads campaign.

What and why: Some users Google for “Geolocation plugin” while others for “Geotargeting plugin”. Although the default word on our landing page is ‘Geolocation,’ we were able to improve our average quality score by 2 points simply by replacing all instances of ‘Geolocation’ with ‘Geotargeting.’ As a result, we’re paying less per click and seeing a better return on investment.

See it live on our site

#3 Capture our cold emails recipient’s attention by including their name on our site (X3 conversion rate!)

Content is visible to Our cold email recipients

Live Example: Fill your name to see how we display it on this page

What and why: We utilize the Query-string DKi shortcode to captivate the attention of our cold email recipients and pique their interest by incorporating their names on our landing page. 

This simple technique helps our emails to stand out, captivate the recipient’s attention, and become impossible to overlook. It has enabled us to triple (!!!) the response rate of our emails and greatly increase the return on investment (ROI) of the cold email marketing channel.

#4 Allow users to include a personalized message on our site when they share it with friends

Content is visible to:  Users who have received a dedicated link to our site from their friends.

What and why: We allow users to share their own personalized, spooky messages with their friends on our site during Halloween.

This cool option helps us generate viral traffic as users visit our site through our Social Media PPC campaigns.

Try It

#5 Display a pop-up on exit intent to users who haven’t viewed this blog post.

Content is visible to: Users who haven’t visited this blog post, when they show signs of leaving the site (hovering the mouse out of the window).

What and why: Each new user is valuable! The worst thing you can do, particularly when you have an amazing product like ours, is to miss out on potential users, especially if they have already visited your site.

We utilize If-So to display a targeted pop-up during exit intent for visitors who have not visited this blog post before.

See It Live

Chosen by GrabHost as one of the top 10 WordPress plugins, If-So stands out for these examples and more!

All About the WordPress Notification Bars – Effortless Boost to Your Conversion Rate

What types of notification bars are available for WordPress?  

First things first, a WordPress notification bar is a thin information strip that can sit either on the top or the bottom of your website. You use them to enhance Call-To-Actions, promotional offers, or other high-impact messaging without being intrusive.

With a massive array of customizations through copy, placement, design, and conditions (such as the user’s location or profile), it is easy to see why notification bars are such a popular choice.  

There are several types of notification bars to consider:

Sticky: While the user scrolls, it stays ‘stuck’ to the top or the bottom of the screen, making them incredibly visible and a good choice for promoting a strong call-to-action or campaign. 

Floating: Staying always visible while scrolling, this notification bar will appear to be ‘floating’ over the content on the page. It can come across as more subtle than a sticky notification bar while still grabbing the user’s attention. 

Closeable: An added close ‘x’ allows the user to close the notification bar. Cookie settings allow you to control when it’s visible again after the user closes it (close just once or never to show again). This gets your message across while letting the user action if they find it intrusive to their user journey. 

Conditional: This notification bar style focuses on a specific target audience and will only be visible to those meeting the conditions or criteria you set. This means your messaging hits only the intended audience for the highest impact. 

Customizable: You can set up your choice of notification bar across the whole website or on a selected webpage.

Benefits of WordPress notification bars? 

Notification bars aren’t solely for grabbing a viewer’s attention and encouraging them to take action; they are notorious for a wealth of benefits: 

  • Cut out annoying pop-ups, avoiding interruptions to the user journey! Keeping important information, alerts, and promos visible without getting in the way will have your viewers even more engaged. 
  • By predominately displaying your message at the top or bottom of the webpage, you map out the desired action of the viewer and boost conversion ratios! 
  • Get personable by saying “Hi” (or welcoming back) your users in their own language. Your engagement ratings will thank you.
  • Skyrocket your sales with messaging intended to upsell and cross-sell during crucial user actions, such as adding a product to the cart during online shopping. 
  • Speak directly to specific viewers by easily setting up target messaging. Creating urgency, promoting products or alerts to viewers from a marketing campaign or geolocation naturally adds personalization to the users’ experience. Watch your sales increase without breaking the bank.

Announcements Bars VS Pop-UPs 

Depending on your primary motivation to add a WordPress notification bar, you may wonder if it is in your best interest to integrate a pop-up instead. The chart below will help you weigh the pros and cons of a notification bar vs a pop-up to determine the best fit for you. 

Announcement BarPop-Up
Visibility✔️Located at the top or bottom of the screen, the announcement bar is easy for the user to see. ✔️Located in the center or side of the screen, a pop-up is easy for the user to see.
Less Disruptive✔️With the location not obstructing the user’s journey, with less action needed by the user to dismiss the messaging, a WordPress notification bar is less disruptive. ❌While pop-ups are intended to grab attention, they do pull the user away from their journey and require a dismissal action to take place before the user can continue.
Customizable✔️Highly personalizable to match the design and branding of the website without the need of a designer or developer. ❌Can be personalized to match your website but require a brief, designer, and a web developer to be completed.
Noticeability ✔️Captivating the user without blocking them from their purpose on the page allowing you the freedom to display them without adding the option for the user to close them.❌Known to be closed without being read, the messaging in a popup is often missed because of its disruptive nature.

What to consider when choosing a WordPress notification bar plugin? 

There are many options for plugins you could choose for your WordPress notification bar, but knowing exactly what features to watch for will give you the confidence that you’re getting the most bang for your buck!

Customization options

Design and Layout

As one of the first or last things your viewers will see on the site, the design must be on-point to compete in today’s bustling online market. Ensure your WordPress notification bar plugin has a range of templates, lets you choose the colors for everything, has a range of layouts, fonts, icons, animations to choose from, and includes a custom CSS option. This way, no matter your team’s skill level or marketing goals, you will master a captivating notification bar that’s still harmonious with your brand.

Dynamic elements

One of the key elements to increasing your sales is relating to your viewer. Adding personalized messages, call-to-actions, or sales lets your target audience know you see them and are there to help. Cutting out the noise of irrelevant content they aren’t concerned with is insurance that they will not only engage with you but keep coming back for your service. Amending the WP notification bar content based on geolocation, time of day, user behavior, or how they arrived at your site will leave you wondering why you’ve never done this before! 

Opening hours-based WordPress notification bar

Targeting options Similarly to dynamic elements which customize the content, targeting lets you control who sees the notification bar (or who won’t), amplifying the effectiveness of your messaging for booming conversion rates. Device type, page, website entry point, and the viewer’s location are ways to maximize your message’s visibility to the right person and at the right time.

Location-based WordPress notification bar

Cookie Settings 

Cookie Settings are essential for creating a seamless user experience on your website. You’ll find straightforward controls to choose if the notification bar should display only once per visit, per browsing session, per day/week/month, and if you will allow viewers to close out of the notification bar. Honing into the cookie settings is the perfect way to avoid your message coming across annoying to your audience. 

Trigger options 

Want to deliver a message to someone who has been browsing for the last 10 minutes? This is where trigger options come in! Controlling when the notification bar is visible based on the time someone has been on the site, the point they scroll (or click) on a page, or when they go to leave the page will drive your message home and intensify the desire for engagement. 

Easy to use 

You don’t need to be a skilled web developer to be able to have a WordPress notification bar. Increasing your conversion rates couldn’t get easier than our no-code needed approach, drag and drop elements, expert-designed templates customizable to fit your brand, and user-friendly settings allowing you more control over your user experience.

Adaptable: Having one plugin that can readily adapt to suit your ever-moving goals will future-proof your website while avoiding site bloat from adding multiple plugins to do the work. You’ll be able to create urgency with a countdown timer, never miss a follower by promoting your socials, or get more sign-ups with an email subscription option, all directly from the WordPress notification bar.

Responsiveness 

Nothing is more annoying than being unable to use a website because they aren’t at a desk! Thankfully, If-So’s WordPress notification bar is fully responsive, ensuring no matter what device or screen size, your viewers will still get the full impact, saving you from unnecessary bounce rates, an organic boost in SEO, and higher engagement. 

Support availability 

Occasionally, you may need support with a theme, mobile, or anything in-between! 

Our support page has a wealth of knowledge and tutorials on anything from integration with a theme responsiveness on mobile or anything in between. 

If you prefer to talk, in 1-day or less, you’ll be in touch with our expert support team, who are ready to answer your questions.

Analytics options 

How do you make sure you’re getting the results you’re after? You measure. Monitoring your stats with the built-in analytics features is proof to our promise. Our plugin is renowned for streamlining tracking by removing complex and unnecessary metrics. With less time spent deciphering analytical jargon, you can confidently boost your marketing strategies using our display and conversion statistics made to measure peak performance.

If-So’s built-in stats

Utilize WordPress notification bars to increase conversion rates today!

Adding a WordPress notification bar is a simple and code-free way to see your conversion rates climb without having to edit any of the content or pages on the website. 

The notification bar’s popularity continues to increase with its variety of customizable settings, designer-created templates personalizable to fit your branding, and tailored messaging and display for any device size. 

Start for free with the If-So’s WordPress Notification Bar plugin and see your business reach new heights!

Ready to get started? Try it free

Maximizing the Benefits of Content Personalization: Examples, Strategies, and 4 Golden Tips

Personalization Objectives: Presenting Value to Your Website Visitors

To achieve successful personalization on your website, your content strategy should aim to achieve two key objectives.

Firstly, your content should provide value to your website visitors. Secondly, your content should be presented at the right time.

For example, imagine an Italian web user visiting your site around Italian Liberation Day. Upon arrival, they are greeted with a ‘Welcome’ message that starts with ‘Ciao dall’Italia.’ This personalized message offers the user 10% off and free shipping to Italy for a limited time. By presenting the user with a brief message in their native language upon arrival, you capture their attention and increase engagement. The clear and time-limited value proposition emphasizes the urgency of the offer and encourages the user to take advantage of it.

The Benefits of Content Personalization

With increasing modernization, people are faced with an endless stream of choices. To set your business apart from others, it is essential to provide tailored picks that appeal to individual customers.

This is where dynamic content comes in.

Customizing content to what your target audience needs can bring multiple benefits:

1. Increased Customer Engagement

Personalization helps attract customers by showing them exactly what they are interested in. With content personalization, customers won’t feel overwhelmed by a flood of choices and can easily find the products they love.

Personalized messages also keep visitors engaged, build trust, and increase the likelihood that they’ll stick around to explore your site further and return to the site in the future.

2. Higher Conversion

When you make things personalized, it’s more likely that people will take action on your website – whether that’s signing up for emails, filling out a demo form, donating to a cause, or buying.

By knowing your customers and what they want, you can make it easier for them to take action and increase your chances of getting that conversion. Check out these examples of how you can use content personalization to improve conversion rate.

3. Increased Sales

Increase your revenue by taking simple steps like upselling and cross-selling – check out this template. Selling to your existing customer base may sound like a no-brainer, but it can have a significant impact on your bottom line. In fact, a report from 2022 found that the majority of professionals who use cross-selling and upselling techniques credit them with up to 30% of their revenue.

Example: Let’s say you run a clothing store, and a customer has added a pink shirt to their cart. You can use personalized content to suggest a pair of black pants or a jacket that would complement the shirt, increasing the likelihood that the customer will add more items to their cart and make a purchase.

How does content personalization work?

Personalized content can be displayed based on the user’s location data, cookies, logged-in user data points, referral sources, third-party services, and many other data sources.

Location Data

One of the best ways to personalize content is by leveraging IP addresses based on the visitor’s location. Apart from the intuitive option to display country (or state) based content, location data can also be used for the time of an event or the business closing time, auto-calculated based on the visitor’s timezone. This option directly leads to visitors having a better experience on your site.

Example: Let’s say you have an e-commerce website that sells outdoor gear. Using the user’s IP address, you can personalize your website’s messaging to showcase products relevant to their location and weather. For instance, if the visitor is located in a snowy area, you could display a banner that says, “Stay warm this winter with our collection of mittens,” or show images of people wearing warm gear in snowy landscapes. This can help visitors feel more connected to your brand and increase their likelihood of purchasing.

Cookies

Cookies can be a useful tool for tracking website visitors’ browsing activity. When a visitor lands on your website, a cookie is stored in their web browser. If-So uses cookies to tag and segment users, track the pages they visit, and monitor their interactions on the site. By analyzing this data, you can gain insights into your website visitors’ behavior and preferences and use this information to create a more personalized experience for them.

Example: Suppose the website visitor of an online clothing store has previously browsed through their collection of women’s purses. With the help of cookies, the store can identify this user’s interest and personalize their future visits by showing them relevant purse recommendations or promotions. This personalized approach could encourage the visitor to make a purchase, increasing the store’s sales and improving the user’s experience.

Referral Source and Dynamic Links

Referral sources help you customize promotions, ads, and features based on the user’s origin. Most effective for sales conversion, you can create dynamic content based on relevant channels or campaigns associated with their last visited URL. 

Example: Your company recently launched a new Facebook advertising campaign to promote a specific product line. Through a special code or identifier in dynamic links, you can personalize the landing page based on the specific advert users are arriving from on Facebook. Trigger buyer’s impulse by providing an additional discount that expires in hours. This enhances the urgency of the product discount, which increases your sales conversion rate.

Third-party Services

Third-party services, like CRMs and ESPs (Email service providers), provide accurate and valuable data about your website visitors, such as their interactions. For example, you can use your ESP to trigger automated emails with products based on a user’s abandoned cart. This personalizes their experience based on their buying behavior to drive sales conversion.

Logged-in User Data Points

Logged-in User Data Points are pre-existing information gathered from a website’s database. The data can be collected based on the user’s journey on the site, upon registration, based on user interaction, and more.

A simple example is using the user’s purchase history on the site to suggest other products the user might be interested in. Think of an operating online store, “Fiddos Goodies,” that sells pet supplies. When a customer that previously purchased cat toys logs into her account on your site, you can show her a banner ad for a new type of cat food similar to the one she purchased.

If your website doesn’t collect the data on which you want to display the dynamic content, you can use a plugin like If-So Custom User Profile Fields to both collect the data and assign it to the user’s profile, and to show the dynamic content based on this data.

Tips to Implement Content Personalization

1. Choose the Right Segment

To get started with content personalization, the first step is to choose the right segment. 

Finding the right segment can be done based on common sense or based on your analytics reports.

Take a look at what’s working and what needs improvement. Pay attention to pages with high bounce rates for users coming from a certain source, as well as users from countries with low conversion rates.

This will help you identify the segments where personalized content will be most effective. By focusing your efforts on these areas, you can maximize the impact of your personalization strategy.

Example: if you notice that users from a certain region have a lower conversion rate, you can personalize their experience by offering them more relevant products or promotions.

2. Keep it Simple

When it comes to personalization, simplicity can be key. Instead of making massive changes, you can often see significant results with small tweaks.

By keeping it simple, you can avoid potential issues down the line and better manage your personalized content.

Additionally, adjusting the wording or image on a landing page can make a big difference in how customers perceive and engage with your brand.

For example, let’s say a local accounting firm wants to personalize its landing page coming from Google Ads based on the user’s search term. To test the effectiveness of personalization, they start by simply changing the header of the landing page. Creating a whole different landing page for each one of their services is a great idea, but in many cases changing just the page title and some of the key content can make users feel they have found exactly what they were looking for and boost engagement and conversion rates.

3. Use the Right Tech

It’s important to choose effective and easy-to-use technology for your website. You want tools that won’t break the bank, won’t slow down your site, and will integrate smoothly with your tech stack.

For example, if you use a cache on your site, you must use a fully compatible tool with page caching. This ensures you can maximize the advantages of page caching and infuse the page with dynamic content from the cache.

Or, if you have multiple dynamic versions, consider incorporating a server-side-based tool that only renders the relevant version when the page loads. This prevents loading all dynamic versions by hiding them from the user.

4. Measure the Success

No marketing effort is complete without the ability to determine its effectiveness.

When it comes to personalized content, you want to understand how often each version of the content is viewed and how it affects the website’s conversion rate. With this information, you gain invaluable insight into consumer behavior that helps you plan your next strategy.

Using a no-coding-required plugin like If-So, you can easily track dynamic content performance. If-So works by streamlining data analysis with a built-in analytics system that automatically tracks the number of times each version of your content is viewed.

This helps you see which version is more popular among your visitors. If-So simplifies the tracking of customer conversions by adding a shortcode on the ‘thank you’ page and calculating conversion rates for each page version. This makes it an easy and efficient option for businesses looking for valuable insights into their website’s performance without complex coding or third-party tools.

Examples of Website Personalization

There are endless ways to make your website more personalized, yet some of the easiest changes can give you the biggest results. Check out these simple but super-effective tweaks you can make to customize your content and see immediate improvements.

Match the landing page copy to search terms in Google Ads campaigns.

One easy way to personalize your website is by making sure your landing page copy matches the search term used in a Google Ads campaign. Here’s a step-by-step guide on how to set up search term-based content. When someone clicks on your ad, they should see a landing page that has a title and content tailored to their search.

Show personalized content to new and returning customers.

Make returning customers feel special by showing personalized content tailored to their previous interactions with your site. Here’s a step-by-step guide on how to set up personalized content for new and returning customers. For first-time customers, provide an introduction to your company and what you have to offer. For example, a vitamin store could display a “New to our store?” message and highlight their popular vitamins. On the other hand, for returning customers, you can greet them with a “Welcome back!” message.  This way, you can create a more engaging and relevant experience for your customers.

Customized content by location.

Making your customers feel at home is important. One way to do that is to customize your website content according to their location. For example, you can grab their attention by displaying their home flag or gain their trust by showing reviews in their native language. Moreover, you can even offer discounts based on local holidays or events. Highlighting certain products that are relevant to their area is another effective way to personalize the content on your website.

For example, if a customer is from Florida, you could showcase sunscreen products, while those from Seattle might be interested in raincoats. And don’t forget about time zones! You can show event times in their local time zone for a more personalized experience. With If-So, it’s easy to tailor your content to customers around the world.

Provide special offers to users who originate from a specific social media post.

By offering a special incentive to potential customers who come from a specific social media post, such as a special Facebook holiday ad, you can easily personalize their experience on your website. This encourages customers to engage with your brand on different platforms, helping you build a stronger connection with them and improving their overall experience with your business.

Upsell, pop-up, and cross-sell to customers based on previous purchases

You can effectively increase sales by using upselling and cross-selling techniques on your website. 

Here is an example of a cross-selling technique: imagine you were looking to buy a gaming laptop and added it to your cart but still needed to complete the purchase. Upon checkout, you receive a pop-up ad for headphones customized to pair perfectly with the gaming laptop.

Looking for more personalization examples?

Check out If-So for even more examples of how you can take your website personalization to the next level! You can find templates and examples that you can filter by content type, goal, topic, and conditions. Whether you’re looking to personalize your landing pages, pop-ups, or even your 404 error page, If-So has got you covered.

Summary

Personalizing your website content can significantly impact your business, from improving customer experience and engagement to increasing conversion rates and revenue. If you’re considering implementing content personalization, some helpful tips include choosing the right audience segment, keeping your strategy simple, using the right technology, and measuring success.

With the If-So personalization plugin, you can easily create targeted content without any coding experience. If-So simplifies the process of content personalization and boosts conversion rates by allowing you to create content that caters to your audience’s needs. It’s compatible with caching and other WordPress plugins and includes built-in analytics to track your progress.

6 Personalization Demos

#1 Displaying the user’s location

Display the user’s location using a simple shortcode.

Conditions/features in use: Geolocation DKI shortcode

People in love If-So!

The country name is displayed using the following Country DKI shortcode.

[ifsoDKI type='geo' show='country']

Other shortcode options allow presenting the user’s continent, state, city, or time zone. More about the Geolocation DKI Shortcodes.

How we did it

It couldn’t be simpler; we just pasted the Country DKI shortcode into the sentence.

The shortcode inherits the style from the wrapping element.

#2 Location-based content and dynamic content from CSV

Show content (any content) based on the user’s location. Use a standard If-So trigger with the geolocation condition or use the CSV extension if you have many different versions.

Conditions/features in use: The Geolocation Condition & The CSV Extension

We created a CSV file with a list of all 249 countries, their names, and flags (the file is available for you to download and use on your site). We used our CSV extension to upload the file and display the column’s content (the column with the flags).

How we did it:

Since we wanted to create 249 different versions of content (one version per country), we chose to use our CSV extension instead of creating a standard if-then dynamic trigger. The CSV extension was built to add and manage thousands of different versions with ease and with minimal effect on the loading speed.

1) We created a new “If-So Bulk”, and uploaded the pre-made countries’ flags CSV file that you can download from our site. After uploading the file, it is editable directly from the site.

This is how it looks:

The CSV file, after being uploaded to the site

2) We pasted the shortcode that displays the content of column C on the page:

#3 Displaying the value of a query parameter

Display a value of any query parameter using a simple shortcode.

Conditions/features in use: The query-string DKI shortcode

👑 {YOUR NAME} is awesome!👑

Fill in your name to see it in action

The query string DKI shortcode displays the value of any parameter in the URL. You can set fallback content displayed when the parameter doesn’t exist in the URL.

[ifsoDKI type="querystring" parameter="example" fallback="{YOUR NAME}"]

Popular use cases:
– Include the name of visitors arriving from your email campaigns.
– Display the word that was used to trigger your Google Ads ad.

More about the query string DKI

How we did it:

We used the query string DKI shortcode below to display the parameter “example” value.

[ifsoDKI type="querystring" parameter="example" fallback="{YOUR NAME}"]

Here is how it looks on the editing side:

#4 Segment users & allow users to select their intrests

Segment users into audiences and show content accordingly. Segmentation can be done based on the user interaction with the site or based on the user selection, as in the following example.

Conditions/features in use: Audiences & User Self-selection Form Extension:

What is your favorite page builder?

Assign users into audiences when an If-So condition is met or when they visit a certain page. You can then show audience-based content when the user browses different pages on your site.

Alternatively, use the audience Self-selection Form Extension to allow users to assign themselves to an audience.

How we did it:

Step 1: Creating the audiences
On the WordPress dashboard, under If-So > Audiences, we clicked “add a new audience” and created three audiences: “Gutenberg”, “Elementor”, and “Other”.

Step 2: Creating the self-selection form
Still, on the audiences page (If-So > Audience on your dashboard), we used the self-selection form generator to generate the shortcode that will show the form and paste the shortcode on the page.

* To enable the self-selection form, you need to install the Audience Self-selection Form Extension

The shortcode used to create the form on this page is:

[ifso_group_selection type="select" options="Gutenberg,Elementor,Other" default-option="Select" ajax="no" ]

Other options included in the form generator are:

  • Selecting the form type – selection form (as in our example), or radio buttons.
  • Reloading the page after the user selection or assigning users to an audience in the background using Ajax (this option is useful if you want to use several selection fields on the same page).
  • Redirection – choose where to redirect users after form submission.
  • And more…

Step 3: Creating a trigger with the audience condition
We created a dynamic trigger with four different versions. One version for each audience, and one version as the default content displayed if the visitor hasn’t selected a preference.

#5 Conditional pop-ups with a sequence of content

Display a pop-up based on a condition on the user’s first visit. Display another pop on the next visit – only to users who saw the first pop-up.

Conditions/features in use: The Page URL Condition & Conditional Pop-ups & The Cookie Condition

Click “GO” to see the demo

Any If-So trigger can be displayed as a pop-up by adding a simple parameter to its shortcode. In this example, we used the Page URL condition (IF: URL > Contains > ?tip=yes) to trigger the first pop-up and to add a cookie to the user’s browser while that happens.

When the page loads for the 2nd time, we use the cookie condition to show the 2nd pop-up if the cookie exists in the user’s browser and remove the cookie so that the pop-up will not be displayed again.

How we did it:
We created a trigger with the content of the pop-ups as the dynamic versions and set the trigger’s content to be displayed as a pop-up.

Displaying the trigger’s content as a pop-up

To make the trigger’s content appear as a pop-up, we installed the Trigger Events Extension and added two parameters to the triggers’ shortcode: ajax=”yes” and display=”modal”.

Here’s how the shortcode looks on our page:

[ifso id="401123" ajax="yes" display="modal" closebtn='#IfsoModalClose']

As you can see in the shortcode, we also included the parameter closebtn=’#IfsoModalClose’. Adding the parameter overrides the default pop-up closing functionality of closing by clicking the background or the small “X” that appears at the top right corner. Instead, closing the model is done by clicking an element with the ID set as the parameter value.

The trigger

Pop-up #1

Pop-up #1 is displayed based on the page URL condition (If: Page URL > Contains > ?tips=yes Then: Show the dynamic version of pop-up #1).

In addition to the content of the pop-up, we included an If-So shortcode that adds a cookie with the name “tips” and the value “2”:

[ifso-add-cookie name='tips' value='2' time='3600']

The shortcode allows you to assign a cookie with any name and value of your choice.

Here’s a screenshot of how it looks on our side:

Pop-up #2

Pop-up #2 is displayed based on the cookie assigned when pop-up #1 was displayed (If: Cookie > Name is “tips” and value is “2” Then: Show tip #2).

Since If-So checks the conditions based on their order in the trigger, from top to bottom, we dragged the version of pop-up #2 to be above the version of pop-up #1. In other words, if the cookie “tips”, cookie value “2” exists in the user’s browser, pop-up #2 is displayed; if not, then If-So checks the next condition, which is if Page URL > Contains > ?tips=yes.

Similar to what we did in the first version, we included the cookie shortcode again, this time to replace the cookie value from “2” to “3”.

[ifso-add-cookie name='tips' value='3' time='3600']

3rd version – removing the cookie

Since we don’t want to keep showing pop-up #2 if the user revisits the page, we have set another version and placed it above the version of pop-up #2. The version doesn’t consist of content, only a shortcode that removes the cookie we have set in the previous version:

[ifso-remove-cookie name='tips']

Default version

We left the default version blank since we don’t want the pop-up to be displayed if none of the conditions are met.

#6 Creating a secret discount (Easter egg)

Apply a discount if a user clicks a certain element (or elements)

Conditions/features in use: Cookie (or page URL) & Trigger Events Extension

Click the genie lamp once, twice, thrice… After the third click, the hidden discount will be available to you, and you’ll be automatically redirected to the plans page.

No coding is required. The clickable element can be made using our “Assign a cookie” wrapping shortcode, and the custom prices are displayed using the cookie condition.

How we did it

We used our “Assing a cookie on click” shortcode to wrap the image of the genie lamp. We set the shortcode to assign a cookie with the name “genie” and the value “yes” after 3 clicks. This redirects the user to the plans page. You can see the shortcode and the parameters we used below:

[ifso_onclick_redirect url='https://www.if-so.com/plans' clicks='3' cookie_name='gennie' cookie_value='yes' expires='1']

<img src="https://www.if-so.com/wp-content/uploads/2022/02/gennie-live-example.png">

[/ifso_onclick_redirect]

The “Add a cookie on click” shortcode functionality is part of the trigger events extension. You can learn more and download it here.

Displaying custom prices on the plans page

We created a new If-So trigger with a cookie condition:
If: Cookie name > genie & Cookie Value > yes, exist in the user’s browser; Then: Show the custom prices

Conditional CSS- Demo & 2 Simple Setup Methods

Want to change the design of your page using If-So’s conditions? You can do so with (dynamic) conditional CSS file changes.

By replacing your style.css file or by loading an additional one, you can easily change the look of your website. With conditional CSS, you have endless possibilities to make small design tweaks or completely transform your page’s look and feel.

Use Cases:

  • Change the design of your website on holidays and special occasions (see how we dressed up our homepage for Halloween).
  • Replace the background of your website at night or when the business is closed.
  • Change the design of your site based on the season of the year.
  • Replace the colors of your site for users from different locations (based on the colors of their flag or sports team).

Set Up Conditional CSS – Step-by-Step Guide

Changing the style CSS of your site is possible in two ways:
1. Loading an extra stylesheet that will override some of the classes of the original stylesheet.
2. Loading a different stylesheet in place of the original one.

Option 1: How to load an additional stylesheet based on an If-So condition?

  1. Create a new conditional CSS stylesheet and upload it to the root directory of your theme. (i.e “dynamic-style.css”).
  2. Create a new If-So trigger.
  3. In Version A, set a condition and then paste the name of your new style file. (i.e “dynamic-style.css”)
  4. Leave the Default Version blank.
  5. Open your functions.php file and paste the following code at the bottom of the file. Make sure to replace the trigger ID with your trigger ID (ifso id=”XXX”).
add_action('wp_enqueue_scripts',function(){
    wp_enqueue_style( 'ifso-custom-style', get_template_directory_uri() . '/' . do_shortcode('[ifso id="646"]') , array() );
});

That’s it! Every time the condition is met, the new stylesheet will be loaded.

Option 2: How to replace the original style.css if a condition is met

  1. Duplicate the style.css file and name the duplication style2.css (make sure to place the file in the same directory as the original style.css file).
  2. Find the URL of your theme style.css file.
    • Open the site in your browser.
    • Click F12, “Network”, “CSS”, and refresh the page.
    • Find your theme style.css file (there might be several style.css files, so hover over each one to see its path and make sure you click on the one that belongs to your theme).
    • Click on it and copy the file URL.
  1. Create a new trigger
  2. Paste the URL you have copied in the default version content field.
  3. In Version A, set a condition, paste the URL of your style.css file, and change the name in the URL to style2.css
  4. Find the enqueue function that “calls” your style.css file. It should look something like this:  
 wp_enqueue_style( 'STYLESHEET URI', get_stylesheet_uri() );

* The value ”STYLESHEET URI” can be anything. It will be whatever the developer of your site named it.

Depending on your theme and how it is built, there are several places in which the enqueue function can be found. Usually, it will be in the function.php file which can be found in the main directory of the theme.

7. Once you find the enqueue function, simply replace the second parameter of the function, “get_stylesheet_uri()”, with the following:

do_shortcode('ifso id="XXX"]')

Make sure to replace the “XXX” with the ID of the trigger you created in the previous steps.

This is what the whole function should look like in the end:

wp_enqueue_style( 'YOUR-STYLE-SHEET-NAME', do_shortcode('[ifso id="XXX"]') );

That’s it! As they say, the devil is in the details, and with If-So, just like that, you’ve created a slightly new, or even a whole new look for your site.

Troubleshooting

If you followed this guide and the conditional CSS doesn’t seem to work, go to If-So > Settings on your WordPress Dashboard and uncheck the “the_content” filter option.

How to Insert a Contact’s Name From your CRM/ESP into your Site?

Using data from your Customer Relationship Management (CRM) or Email Service Provider (ESP)  is a great way to personalize a user’s experience on your site. The user’s name or any other data can be automatically included as a query parameter in the URL, and be displayed on your website using a simple shortcode.

Live Example: Click here to See how we display the name “Bob” on our website’s main banner.

What kind of information can I use?

CRMs and ESPs can store lots of information about your users, such as name, email, location, and even preferences they may have filled out on a form on your site. All this data can be added to links created by these systems as a value of a query parameter. In most CRM’s and ESP’s, these parameters are usually called “Merge Tags”. 

Merge Tags

CRMs and ESPs use “merge tags” to correspond with fields and information from your database. These “merge tags” are the format for the query string parameter. 

For example, if you are using the “User Name” merge tag, the user’s name will automatically be added to the links from your email campaign to your website (i.e example.com?firstname=Bob).

How to display a name (or any other data) on your site using a shortcode

Once you have the user name, or any other value, as a parameter in the URL, you can use our query string DKI shortcode to automatically display that parameter value on your page. 

The shortcode will display the value of any parameter of your choice. Simply, paste the following shortcode on your site and replace the parameter name with your own parameter name.

[ifsoDKI type="querystring" parameter="YOUR-PARAMETER" fallback="Default value - optional"]

For example, the shortcode below will display the value of the parameter example

[ifsoDKI type="querystring" parameter="example"]

Setting up a fallback

By default, the query string DKI shortcode will not display anything if the parameter doesn’t exist in the URL. If you want to set a different value, simply add the parameter fallback=”your value” to the shortcode, and set its value.

[ifsoDKI type="querystring" parameter="YOUR-PARAMETER" fallback="your value - optional"]

Displaying values of more than one query parameter

You can use the Query string DKI shortcode numerous times on the same page. All you have to do is to add a shortcode for each one of the parameters.

Passing multiple parameters in the URL is done by separating each parameter with an & sign.

i.e. example.com?param1=value1&param2=value&param3=value3

If you want to display the output of the query-string DKI shortcode when users browse other pages on your site, add the parameter persist=”yes” to the DKI shortcode. Learn more.

Tags used by common CRMs and ESPs

For your convenience, here is a list of tags used by common CRMs and ESPs:

  • MailChimp’s merge tags: |TAG| (e.g. |FIRSTNAME|). Learn More.
  • ActiveCampaign’s merge tags: %TAG% (e.g. %FIRSTNAME%). Learn more.
  • Drip’s merge tags: {{ tag }} (e.g. {{ firstname }}.
  • ConvertKit’s merge tags: {{ tag }} (e.g. {{ subscriber.first_name }}). Learn More.
  • HubSpot’s merge tags: {$tag} (e.g. {$FirstName}). Learn More.
  • Salesforce’s merge tags: {!ObjectName.FieldName} (e.g. {!Contact.FirstName}).
  • AWeber’s merge tags: {!tag} (e.g. {!firstname}).
  • Bronto’s merge tags: %%tag%% (e.g. %%firstname%%).

Reserved WordPress Terms (parameters)

WordPress reserves some parameters for its own use. Adding these parameters to the URL may result in a 404 error without any other hint or explanation. 

Click here for the full list of reserved term

Using If-So’s Main Features: How we changed the look of our homepage for Halloween

Before we dive in, click here to see the live version of our Halloween Page

If we could choose one holiday that best fits If-So it’s the one where everyone gets dressed up to play tricks on their friends!

This Halloween, we decided to seize the moment! We will show you how we were able to easily change our homepage by using some of If-So’s main features. 

Our new look started with setting the tone by loading a new CSS sheet for users arriving from our Halloween campaign, and we didn’t stop there. We created holiday-based dynamic content and made the site interactive with dynamic keyword insertion, and more. 

Here is a list of the main things we did. Detailed information about each one of them can be found below:

Using these main features on your site can really increase user experience and engagement. We hope you’ll have as much fun with If-So’s features on your site as we did!

1. Conditional CSS

Conditional CSS makes it super easy to change the look of your site with Conditional CSS sheets without compromising the original style. You can tweak small changes or entirely modify the look without having to change the existing style (code). 

There are 2 ways to change your CSS sheet on your site:

One of the cool things about loading an additional style sheet is that it’s extremely simple to apply the changes again next year. Or, you can duplicate the additional CSS file and make adaptations like in this case, for other holidays.

How can you benefit from using conditional CSS on your site?

  • Make holidays extra special with graphic designs and colors to mimic the holiday’s feel.
  • Focus on local holidays and events and make users feel more connected when they arrive at your site. Users from the rest of the globe will see the standard version of your site.
  • Use A/B testing to decide which colors are best for your design and have the best conversion rates.
  • Replace images that are embedded on your site using CSS background images.

For a Step-by-step Guide on how to load an additional style sheet.

2. Dynamic Content 

The main purpose of If-So is to improve engagement and conversion rates by personalizing selected messages on the site to best fit user needs. The idea is that you don’t need to work hard to change the entire page. In most cases, huge ROI can be achieved by simply adding or replacing a small portion of content, like titles and calls to action.

How did we use dynamic content to customize our Halloween page?

If-So is extremely flexible, it allows you to replace any element on your page, including titles, text, images, and even menu items. Taking advantage of its flexibility, there are several conditions we used on our page:

UTM Parameter – The UTM Parameter condition allows you to show dynamic content based on the value of any UTM parameter.

In our example, we used the condition to add a noticeable  “Halloween Sale” message right below our site’s title so that there’s no way anyone could miss it. We also replaced some other elements on the page like the image of the grim reaper and the bottom CTA which are a part of the page content.

How can you benefit from using the UTM Parameter condition? This condition allows you to show exclusive content to visitors arriving through:

  • Email marketing and newsletters.
  • A specific Facebook ad or post.
  • A specific campaign or ad group in Google Ads.

Schedule – The schedule condition allows you to schedule content changes based on the day and time.

We used the schedule condition to showcase our product and greet visitors with a relevant welcome message  according to the time of the day: 

How can you benefit from using the schedule condition on your site?

  • Show a click to call button on your business opening hours (on mobiles only, combining with the device condition)
  • Display a contact form when your business is closed
  • Show your opening hours when the business is closed

User Language – The user language condition allows you to personalize content based on the user’s browser language. Having dynamic content that speaks to the users in their own language is a great engagement tool. It automatically grabs the user’s attention and curiosity.  

In our Halloween example, we used the user language condition to translate the “Happy Halloween” message to a variety of different languages. 

How can you benefit from using the user language condition on your site?

  • Improve engagement by displaying a short message in your visitor’s language.
  • Translate your website’s calls to action – a proven way to improve conversion rates.
  • Display testimonials or product recommendations in the visitor’s language.
  • Redirect users to a page in their own language (or add a suggestion to visit a page in their language).

For more details about the user language condition

Geolocation –  The geolocation condition allows you to set content changes based on the user location: continent, country, state, city, or timezone.

We used the geolocation condition to create a personalized content experience by tweaking the message displayed on the grim reaper sign – “I’m coming to {your state} to get you”

How can you benefit from using the geolocation condition on your site?

  • Create promotions in specific countries.
  • Highlight different products in chosen locations.
  • Invite nearby visitors to visit your business.
  • Direct visitors to the closest branch.
  • Show personalized messages to visitors from certain locations. For example, “free shipping around the UK” for visitors from England.

For more details about the geolocation condition

3. Dynamic Keyword Insertion

If-So Dynamic Keyword Insertion shortcodes allow you to use different shortcodes to your site, which will automatically be replaced with relevant content when the page loads. For example, you can use a shortcode that will show the name of the user’s country/state. Or, use a shortcode that will display the value of a query parameter.

Among other things, we used our query-string dynamic keyword insertion shortcode to display the user name or jobon our top banner. 

For example, we added the query string ?n2=designers to the final URL of all of our Facebook ads that are targeted toward designers, and add a DKI shortcode that will automatically display the query value “Designer”.

Alternatively, when we sent an email to our mailing list, we included the same parameter and added a tag for “name” as the parameter value. Our mailing system transferred the user name to the URL, and our DKI shortcode made sure to grab the name from the URL and display it on the site.

For more details about the geolocation condition

Try it! Use our DKI shortcodes to show your own message on our website!

We created a sharing form that generates URLs with the relevant query strings. The content you add in the form will be used to generate a URL and, the values you entered will then be displayed on our website!

4. If-So Countdown shortcode

[ifsoCountdown end="10/31 16:00" format="day-sec" labels="true"]

If-So Countdown is an add-on that allows you to display a countdown using a shortcode. Adding a countdown is a proven way to create a real urgency for your website visitors and to push them to take the action you want.

We used the If-So Countdown add-on on the top of every page to make sure visitors will see a clock counting down to when our Halloween offer expires.

How can you benefit from using the If-So countdown add-on?

  • Create a real urgency for your website visitors to take action.
  • Schedule the countdown to show when the business is about to open/close.

Haven’t downloaded If-So? Get the free version here.

If-So Version 1.5.0 (Page caching compatibility)

New Features of If-So Version 1.5.0 – Ajax Loading Compatibility

How To Enable the Ajax Loading?

There are two options to enable Ajax loading:
1. Enable the Ajax loading for all the triggers – On your WordPress Dashboard, go to If-So > Settings and check the “Render triggers via Ajax” checkbox.

Please note! If you have an If-So shortcode pasted inside another If-So trigger, and you set If-So to load triggers with Ajax, you need to make sure the nested shortcode is not loading with Ajax. In order to do so, simply add the parameter ajax=”no” to the nested shortcode.

2. Enable Ajax for specific trigger only – To make a specific trigger load with Ajax you can add the parameter ajax=”yes” to the trigger shortcode:

[ifso id="123" ajax="yes"]  

IS the Ajax Loading Mode will Cause the Dynamic Content to Be Displayed in Delay

When Ajax Loading is enabled, the static content of the page is served from the cache, and the dynamic content is rendered a moment after. Naturally, there will be a delay between the loading time of the two. The length of the delay depends on numerous factors, like the way your site is built, your server, the amount of dynamic content, and more.

On our test, it didn’t take more than a second for the content to load (with 5 different triggers on the page). If you find the delay very long, we will appreciate it if you’ll contact us at support@if-so.com and let us know.

Displaying Personalized Content Using Elementor

You asked for it, and our developers made a huge effort and got it done quickly! We are proud to present our new Elementor widget and to show you a simple way to use any Elementor element inside If-So – NO CODING REQUIRED!

Introducing the New Elementor Widget

The new Elementor widget makes it easier to add an If-So trigger to your page, manage your dynamic versions, and best of all, see the results!

Meet the new Elementor Widget

Creating content in Elementor and using it in If-So

To design and create content with Elementor and use it inside If-So:
1. Create the content with Elementor
2. Save the content as a template
3. Go to the templates section on your WordPress dashboard
4. Copy the template shortcode and paste it within the If-So version content field

The option to apply a template using a shortcode is only available on Elementor Pro. If you are using the free version, there are some free plugins, like piotnet, that can add the same functionality.

The option to apply a template using a shortcode is only available on Elementor Pro. If you are using the free version, there are some free plugins, like piotnet, that can add the same functionality.

How to Create Dynamic Content in the Gutenberg Editor

Creating Dynamic Content on Gutenberg Page Editor with If-So

If-So Dynamic Content provides an effortless way to design a personalized experience while building your page in Gutenberg. You simply create several versions of any element on your site. Then set up the conditions in which each version should show. Using the dedicated Dynamic Content Gutenberg block, you then add the dynamic trigger to your post or page.

Let’s look closer at how this works in practice:

Step 1: Creating a Dynamic Trigger

Creating a dynamic trigger takes less than a minute. After activating If-So on your site, you’ll have the option to create a new dynamic trigger. A dynamic trigger is made up of one or more dynamic versions, and default content. Each dynamic version has a condition that is checked when a page on the site is rendered. If the condition of the first dynamic version is met, the version is displayed. If it is not met, If-So will check the condition of the next dynamic version. If none of the conditions are met, the default content will be displayed.

The following chart explains the basics of creating a dynamic trigger: 

Creating a trigger with multiple versions. If the condition of version A is not met, the condition of version B will be checked and so on

Step 2: Adding Dynamic Content to your Site with Gutenberg

As with any other block, there a couple of ways you can add the Dynamic Content Block in the Gutenberg Editor:

  1. Click on the (+) icon, search for “Dynamic” and select the dynamic content block.
  2. Hit “Enter” at the end of the content, and a new paragraph block will be automatically added. Type “/” and you will see an autocomplete menu with the list of available blocks. Just type “dynamic” for the Dynamic Content Block. 

The Dynamic Content Gutenberg Block

The Dynamic Content Gutenberg block shows a list of your dynamic triggers. Select a trigger and update the page. This will result in one of the trigger’s content versions to pop up upon page rendering. 

The Dynamic Content Block includes two buttons that will make it easy to add and manage the dynamic content:

1. Edit Trigger – This button will open the trigger’s editing page in a new tab, so you can easily edit and update the trigger. You can also apply changes in your dynamic versions.

2. View Trigger – The button allows you to see all the dynamic versions of the trigger exactly as they’ll appear when rendered on your site.  

A screenshot of the Dynamic Content Gutenberg Blog

Tracking the Performance of your Dynamic Content

On each trigger editing page, If-So allows you to track the success of each dynamic version. A built-in analytics system allows you a simple view of how many times each version was displayed, and how many conversions occurred as a result.

A screenshot of the analytics widget

The Dynamic Content on Gutenberg Page Editor is a major step forward for improving your UX, conversion rate, and personalization. The If-So Plugin saves you time and budget by offering a simple solution on a familiar interface. 

Download If-So for free from the WordPress directory and open countless new possibilities by providing your visitors a personalized, exciting, content experience.

How to create search term-based content: A step by step guide.

The Google Ads Condition allows you to change content on your website according to the user’s search term to users arriving from Google Ads campaigns.

Make your visitors feel like they have found exactly what they are looking for!

The Google Ads condition is extremely powerful and practical. Setting it up only takes a few minutes and the results are amazing and immediate! By making a minor change to your landing page title or image, you can make any user feel like they have found exactly what they are looking for, which will greatly improve your ROI from Google Ads campaigns.

For example, If a user searches for your product name + recommendations, you can indicate in the headline that your product received particularly high recommendations. If they searched for the product name+price, present price-related information (Graphics: mobile phones, starting at $ 69) and so on, for every product.

How to set up search term-based content using If-So?

Setting up dynamic content according to the search term is extremely simple. No coding is involved.

First, you’ll have to create a Dynamic Trigger using If-So, a dynamic trigger consists of a condition (or several conditions) and a version of the content that will be displayed if it is met.

The second step will be to tell Google Ads which content version to display for each search term. This is done by simply pasting a short string of text that will be generated by If-So during the creation of the dynamic version.

Part 1: Creating dynamic content versions

In this step, we will create two (or more) content versions. It can be versions of any element of your site: Title, text, images, etc.

The dynamic version will be displayed based on a query string that will be added at the end of the URL. For example:

Users who visit the URL your-site.com will see a standard version of your website, while users who visit the URL your-site.com?ifso=red will get to the exact same page with the dynamic content replacing one of the elements or added to the standard version of the page.

  1. On your WordPress dashboard, go to “If>So → Add New Trigger
  2. Click on “Select a condition” and select “Advertising Platforms“.
  3. Select “Google Ads” (it should be the default selection, just make sure it is selected)
  4. Type in a keyword. It can be a word, phrase or one letter. This keyword will be the value of the query string that will eventually be added to the Final URL (ex. If you type “red” the dynamic version will be displayed if the query ?ifso=red will be added at the end of your page URL).
  5. In the content field of the version, set up the dynamic content.
  6. In the default content field, set content to be displayed as default, to users who do not arrive from your ads campaign. This field can be left blank if you don’t want to display anything by default.
  7. Press “Publish” and paste the shortcode generated by If>So in your website.

Part 2: Tell Google Ads when to show each version

There are to ways to set Google Ads to show the dynamic version:
1. Pasting the URL that includes the query string directly in the final URL field.
2. Using the “Tracking Template” field to make Google Ads adding the query string automatically a the end of the Final URL.

Option 1: Using the Final URL field

The Final URL is the URL address of the page on your website that people reach when they click your ad. Its value is set while creating your ad, but can be overridden if you fill it in the keyword level.

Setting up the Final URL in the Keyword-level:

  1. In the page menu, click Keywords
  2. Add the “Final URL” column if needed. Learn more.
  3. Scroll over the “Final URL” column of the keyword you’d like to specify a landing page for and click the pencil icon when it appears.
  4. In the Final URL field, enter your landing page URL with the addition of the query string (i.e. your-site.com?ifso=value)
  5. Click Save.

Setting up the Final URL in the Ad-level:

  1. Find the ad you’d like to edit.
  2. Hover your cursor over the ad’s name and click the pencil icon.
  3. Select Edit.
  4. In the Final URL field, enter your landing page URL with the addition of the query string (i.e. your-site.com?ifso=value)

Option 2: Using the Tracking Template field

The Tracking Template field exists in every level of your account (Account, Campaign, Ad-Group, Ad, and Keyword). It allows you to enter parameters the will be added to the Final URL you have set. In order to use the tracking template option in one of the levels of your account, you must first set up the final URL at that same level. More about tracking template at the Google Ads help center.

Setting up URL options at the ad group, campaign, or account level means that you can update your tracking information without resubmitting your ads for approval. However, if you set up or edit at the ad, keyword, or sitelink level, they will still need to go through review.

How to set up the Tracking Template in the Keyword-level:

  1. Click on the Keywords page menu.
  2. Add the “Tracking Template” column if needed. Learn more.
  3. Hover over any entry in the new “Tracking template” column, and click when the pencil appears.
  4. Paste the string found below the condition of the version from your If-So trigger. Paste the entire string, including the {lpurl}, the question mark, and then any ValueTrack parameter.
  5. Click Save.

How to set up the Tracking Template in the Ad-level:

  1. Click on the Ads & extensions page menu.
  2. Hover over the ad.
  3. Click the pencil icon when it appears.
  4. Expand Ad URL Options.
  5. Paste the string found below the condition of the version from your If-So trigger. Paste the entire string, including the {lpurl}, the question mark, and then any ValueTrack parameter.
  6. Click Save.

How to set up the Tracking Template in the Ad group-level:

  1. Click on the Ad groups page menu.
  2. Add the “Tracking Template” column if needed. Learn more.
  3. Hover over any entry in the “Tracking template” column.
  4. Click the pencil icon when it appears.
  5. Paste the string found below the condition of the version from your If-So trigger. Paste the entire string, including the {lpurl}, the question mark, and then any ValueTrack parameter.
  6. Click Save.

How to set up the Tracking Template in the Campaign-level:

  1. Click on the Settings page menu.
  2. Hover over any entry in the “Tracking template” column.
  3. Click the pencil icon when it appears.
  4. Paste the string found below the condition of the version from your If-So trigger. Paste the entire string, including the {lpurl}, the question mark, and then any ValueTrack parameter.
  5. Click Save.

You can use the “Test” button to check that your tracking is set up correctly. Once you click “Test,” Google Ads will combine your final URL with any tracking you set up to make sure your ad will lead to a landing page URL. Learn more.

Gender Differences in Digital Marketing: Why should men and women be handled differently?

The world of digital marketing is focused on developing a message around your product or service and delivering that message to a targeted audience—at scale. Often, this targeted audience is extremely granular. Facebook ads, for instance, let clients target based on things like interests, activities, or locations. That said, gender is something that digital marketers cannot ignore. Simply put, in some cases, men and women should be handled differently when marketing products or services.

Research proves that digital marketers should pay close attention to these gender differences. According to Gloria Moss’s Gender, Design and Marketing: How Gender Drives our Perception of Design and Marketing, males and females shop differently. They don’t analyze a product or service in the same way and their motives for shopping can significantly differ.

The fact remains that digital marketers must take a nuanced approach when marketing to both genders. By doing so, they will ultimately find more success in selling their product or service. In this article, we will further explore certain gender differences that marketers must take into account when communicating with their audiences.

Men and Women Have Varying Motives for Shopping

One of the biggest differences between male and female shoppers centers on their motives for shopping. Even though it is easy for marketers to focus on a single value proposition for their product or service, men and women often look at these offerings in a different way.

According to a study by The Mediterranean Journal of Sciences, men take a more utilitarian approach to shopping while women are more hedonistic. By utilitarian, we mean that these male shoppers are focused more on the practical elements of the product or service. They are shopping to “get something done” and solve an underlying job in their lives. By contrast, by arguing that females are hedonistic, we mean that they are more likely to rely on their intrinsic or emotional responses when contemplating a purchase.

Addressing Varying Motives in Your Marketing Campaigns

This difference can play a large part in whether your digital marketing message properly resonates with your audience. For instance, if your product or service targets men (like men’s clothing or even a product for his car), you are going to want to be biased toward delivering a utilitarian message. You should show how your specific product will solve the current pain point in their lives. The pain point may be small, but by framing your message in this way, statistics show that your message will be stickier. If you are targeting women, appeal to their emotional or intrinsic side. Explain how your product or service is going to make them feel. Convince them that it is going to improve their lives in a dramatic way. Doing this will increase the odds that your targeted women will make the purchase.

Visual storytelling can be powerful in reaching this segment. Using tools like Picsart can assist marketers to quickly modify an image, perhaps pulling attention to ways your product or service enhances feelings of joy or offers comfort. Such emotive imagery showcases that the product is not just a purchase, but a significant addition to their lifestyle.

Men and Women Arrive at Decisions Differently

Digital marketers must also account for the different ways that men and women arrive at decisions. While all of us make that final choice of purchasing or not purchasing the product, we come at it from different angles.

Let’s start with the ladies. Women embrace a holistic approach to making a shopping decision. They integrate all of the elements before signing on the dotted line. They are more than happy to take their time and look at the big picture. Men take a much more direct route. Generally speaking, their approach takes advantage of elimination. They decide which parts of a product or service matter most and then eliminate those products or services that don’t have those elements. They eliminate the competition until one product or service remains.

Addressing Varying Decision-Making in Your Marketing Campaigns

Like motive, these decision-making approaches can have large consequences when marketing to different genders. Let’s say that you are trying to sell a kitchen appliance to a woman and a man. When marketing that appliance to a woman, it would be in your interest to explain how each positive element of your product creates a comprehensive plethora of value to that shopper. In other words, you will want to paint the metaphorical tapestry for the female shopper. As for men, you need to gain an intimate understanding of what men are looking for in the appliance generally. From there, show how your appliance contains those elements and that your competitors’ appliances don’t have those elements. You’ll increase the odds of having your message stick with your male targets.

Men and Women Differ on Where the Final Purchase Occurs

While both genders are obsessed with online shopping, there are some differences in their attitudes toward shopping on different types of devices. Surveys show that men are more likely to use their mobile phones to shop than women. And as far as tablet shopping, 20.4 percent of male respondents said that they have used tablets like iPads to purchase goods or services while only 16.9 percent of female respondents have done the same. When purchasing through mobile devices, men want an experience that saves them money and time. Women are looking for experiences that let them browse catalogs and products and easily share their finds with others.

Reaching Men and Women Where They Love to Shop

Even though digital marketers may not be intimately involved with the design of their mobile websites and apps, they must do the best they can to account for these behavioral differences. For instance, if your product or service is more catered toward men, work with your colleagues to ensure that the mobile versions of your website are free of bugs. Do your best to make sure the checkout funnel is as clear and short as possible. Feel free to entice male customers with financial incentives on your app. If you are targeting women, make sure that your mobile website and app let them easily share targeted items with friends and family.

Men and Women Respond Differently to How Information is Presented

Finally, one key difference that digital marketers should account for is gender differences related to communication. It’s quite obvious, but it is worth repeating: you cannot use the same message when trying to sell your products to both genders. In a general sense, men like receiving all important information upfront and then obtaining background information later. For women, however, the process is more effective when it is reversed. Women like receiving background information first and then receiving the important information that can lead to the sale. Because women embrace this holistic approach and make decisions on a deeper level, providing thorough background information earlier in the pitch can pay off in spades down the road.

Communicating Your Pitch to Men and Women

Therefore, when marketing your product or service to men, don’t hesitate to get straight to the point. Be direct and show how your offering can make a tangible difference in their lives. For women, don’t hesitate to take it slow. Paint the entire picture for them and close with the most important information.

Conclusion: Taking Advantage of Gender Differences

While some digital marketers view gender differences as an obstacle they need to overcome when making a sale, the more appealing perspective is that gender differences can be a massive opportunity. By understanding the differences outlined above and iterating your pitch to account for them, you will find more success when marketing to both genders.

Ultimately, the best time to get started is today. Whether you run a small experiment on a new product or service you are marketing or take a larger, more comprehensive approach to account for these differences, taking action today will lead to massive benefits in the future.

  • Was this Helpful ?
  • YesNo

What is Dynamic WordPress Content?

What is dynamic WordPress content?

At its core, dynamic content for WordPress can be described as a type of content that changes its behavior depending on several factors. The factors might include the user’s profile, as well as their interests, engagement with the website, and more. Dynamic content is very effective, and even though it might sound complicated, it is not.

Dynamic WordPress website examples

Dynamic content has many purposes, and there are many examples of how it can be used to enhance a website with some intelligence features. E-commerce websites are classic examples of dynamic content implementation.

Take a look at reverb.com, for example. This is a website that provides marketplace solutions for musical instruments, similar to eBay. If more people are looking at an item or have placed a bid, the page will show different information and notify visitors of any bids or offer in progress, as well as giving them a detailed breakdown of how many people are watching the item. This is meant to create a sense of urgency, which can help maximize sales and drive the market for any given item.

Dynamic content can also be used to create a personalized experience for visitors when they enter the website. For example, users getting to the page from a specific source, such as an email list, can get a customized experience by retrieving their names or by showing them special offers or exclusive content 

Dynamic content vs. static content

Even though dynamic content is quite different from static content, it doesn’t necessarily mean that one is better than the other. In fact, it is really about using the right content typology based on your particular needs and situation. In other words, it is important to understand that both dynamic and static content are very important when it comes to designing a successful website. You could think of dynamic content as that part of the design that caters to the user experience, making it more personal and unique to each visitor. However, the static content is just as important, and you could see it as the “skin and bones of your website.”

Dynamic content for small businesses

Today, most websites, emails and marketing content relies heavily on dynamic content. WordPress plugins like If-So Dynamic Content enable users to create dynamic content easily. Site admins can even see statistics, indicating how many times each version of the content was displayed, and how users engaged with the site after seeing it. In conclusion, dynamic content features make for an excellent solution to the web design needs of many customers, including smaller businesses.

  • Was this Helpful ?
  • YesNo

WordPress Super Cache and Dynamic content

Important update! If-So is now complitely compatible with page caching!!! You can keep using cache as ususal and load the dynamic content using Ajax.

Learn more about dynamic content and page caching →

WordPress Super Cache is a popular free caching plugin for WordPress users. Like most WordPress caching plugins, it is used to improve load times and enhance the overall user experience by presenting your web content more quickly. By default, WordPress neutralizes the ability to serve dynamic content, some simple settings will allow you to do so.

WordPress Super Cache – page caching

One way this works is through a concept called page caching.

The plugin generates a cached file when a page is requested for the first time, stores it for a pre-defined duration, and then provides it to the next visitor that requests for the page. Serving the cached version instead of fully rendering it all over again cuts down on how long it takes to load a website.

While it is easy to see why this is such a helpful tool, it is important to understand that using page caching eliminates the ability to use dynamic content and cookies. Dynamic content, which is designed to provide a more custom user website experience based on certain inputs, means that a web page might not look the same way for every user. Consequently, when the WordPress super cache serves the cached version, it might not match the version that should have been presented to the user.

The solution, using both page caching and dynamic content

Fortunately, WordPress makes it easy for you to benefit from both page caching and dynamic content. The approach is easy, all you have to do is to turn off page caching for the web pages with dynamic content and cookies. This way, you can keep using it to provide a quality user experience, that is also custom at the same time.

How to exclude pages from the cache while using WordPress Super Cache

  1. On your WordPress dashboard, go to Settings → WordPress Super Cache → Advanced (tab).
  2. a. Find the “Accepted Filenames & Rejected URIs” section.
    b. Select the relevant pages .
  3. Click “Save settings”
  1. On your WordPress dashboard, go to Settings → WordPress Super Cache → Advanced (tab).
  2. a. Find the “Miscellaneous” section.
    b. Select “Disable caching for visitors who have a cookie set in their browser”.
  3. Click “Save settings”

WordPress Personalization – Advantages

Are you looking for a cost-effective way to get a killer website done while retaining a personalized content experience? WordPress personalization might be the best solution for you. This free and open-source content management system started out as a blogging platform. Today, it is so much more than that. Individuals, businesses and organizations use it as a platform to build and host websites.

If this wasn’t enough, the main advantage of WordPress is the ability to easily add extra functionality to your site. Using a WordPress personalization plugin can be an amazing way to add more functionality and character to your website.

WordPress personalization plugin

The main benefit of WordPress personalization is that you can use a plugin to do the work for you. In fact, one of the best aspects of using personalization plugins for WordPress is that you do not need to know coding or web design to achieve excellent results. You can add the plugin to any site and the process is very simple, with no coding skills required whatsoever.

WordPress personalization advantages

Personalized WordPress websites have many advantages:

Better results: More conversions, less bounce rate, improved ROI

The first and probably most important advantage is that the user can get it right from the start. Customized content makes users feel like they have found exactly what they were looking for, without too much effort. In addition, personalization can be a fantastic way to increase the conversion rate of your website, as well as improve your return on investment (ROI), bounce rate and productivity overall.

Uniqueness and memorability

Personalized websites are more unique and memorable. With some customization, you can enhance the appeal and impact of your site. People will remember it’s uniqueness and connect with it on a more personal level.

Are you looking for additional tips and information about Personalization in WordPress? If so, feel free to reach out!

Already own a WordPress website? Download If-So for free from the WordPress library and provide your visitors with a personalized content experience within minutes.

  • Was this Helpful ?
  • YesNo

Displaying Dynamic Content on a Webpage Using UTM Parameters

UTM parameters are a valuable tool that you can use to gain useful insights into which of your marketing efforts are bringing in the right traffic to your website. With the help of the If-So WordPress plugin, you can now get the very most out of UTM parameters and customize your web page content based on the UTMs.

In this article, we will be exploring the importance of UTM parameters and how you can use them for tracking. We will also explain how you can use If-So to easily add or replace content based on the UTM codes already in use to track campaign performance.

What are UTM Parameters?

What are UTM Parameters

UTM (Urchin Tracking Module) parameters are short strings of text that you can add to a URL in order to track the effectiveness of online marketing campaigns across traffic sources and publishing media. Each time that a URL with a UTM parameter is clicked, data is automatically sent to Google Analytics for you to review. This is valuable because it returns data that not only shows where your website visitors are coming from but also how visitors arriving from a particular marketing effort interact with your site.

The structure of UTM parameters

UTM parameters are initialized by the question mark “?” at the end of the URL. Each parameter starts with its name and is followed by equals sign “=” and its value without spaces. Several UTMs are divided by an ampersand sign “&”.

Example URL, UTM parameters highlighted, after the question mark (?):

https://www.example.com/page?utm_medium=social&utm_source=facebook

In total, there are 5 variants of UTM parameters that you can track including:

  • utm_source– This UTM parameter is used to show where traffic is coming from
    (e.g. Google, Newsletter).
  • utm_medium– A utm_medium parameter returns data that identifies the marketing channel. Social, Organic, Paid, Email, Affiliates, are all core marketing channels that include multiple traffic sources.
  • utm_campaign– This UTM parameter is the overall campaign you are launching. This depends on a specific goal. If your business is launching a new product, this UTM parameter would be displayed as something like “newproduct_launch”.Feel free to fill this in however it makes sense to you. Names that allow you to easily identify product launches, promotional campaigns, individual emails or posts, etc. are all good.
  • utm_term– When conducting keyword research, this UTM parameter can be very helpful. When participating in paid search advertising, a utm_term parameter is used to identify the search term that your ad was bidding on.
  • utm_content– This is an optional field. If you have multiple links in the same campaign, like two links in the same email, you can fill in this value so you can differentiate them.

How to Use UTM Parameters For Tracking

Now that you understand what UTM parameters are, you may be wondering how to use them for tracking. Luckily, the process is actually very simple. When working with Google Analytics, you can implement UTM parameters by using the Google Analytics URL Builder.

The Google Analytics URL Builder displays an easy-to-use form where you will enter your website’s information as prompted. This includes factors such as website URL, campaign source, medium, term, content, and name. After submitting your inputs, you will simply take the link that the URL Builder has generated and attach it to the element you want to track.

a screenshot of the Analytics url builder

One of the best things about UTM parameters is that they can be easily edited if you end up needing to change factors as you continue tracking elements of your website over time. To do so, you just have to generate a new link by changing the necessary factors and attaching it to the right element.

Where do I find UTM data in Google Analytics?

In your Google Analytics dashboard, go to the left sidebar and click “Acquisition”, in that menu click “All Traffic”, and from there click “Source/Medium”.

A screenshot of Google Analytics menu - acquisation report

How to Display dynamic content based on URL parameters

By using UTM parameters, you can gain insight on what users are interested in. To get the most out of UTM parameters, use the If-So Dynamic Content WordPress plugin to create UTM based content. This makes your website more user-friendly because the right content will be shown to visitors based on what data suggests about their interests. If-So’s WordPress plugin is user-friendly and takes a matter of minutes to set up.

UTM based content may be useful on any marketing channel. Just as an example:

  • Email marketing and newsletters– show specific content to visitors that are directed to your website through emails and newsletters.
  • Social media platforms– show exclusive content to visitors arriving from social media platforms. An example of this is visitors directed to your website from a specific Facebook advertisement or post.
  • Google Ads– show predetermined content to visitors that arrive through a specific campaign or ad group in Google Ads.

Powerful Examples of Using Dynamic Content Based on URL parameters

To give you a better idea of the power of UTM based content, let’s take a look at a few examples. Each of the websites in the examples resulted in increased traffic, more conversions, and insight that could be used to improve marketing efforts overall.

Example 1 – Focused content based on the user search on Google

A restaurant that offers both vegetarian and meat-based dishes is advertising on Google Ads. The restaurant is using UTM parameters to track visitors arriving from each ad group. One of the ad groups is dedicated to keywords relating to vegetarian foods.

In an effort to result in better conversion rates and ROI, the restaurant replaces the main banner. When users are directed to the website from search terms based around vegetarian foods. The banner dedicated to vegetarians is placing emphasis on the restaurant’s vegetarian options.

Example 2 – Showing a festive website banner to users on their birthday

A clothing company is sending out automated emails containing a special discount to users on their birthday.

When users click the link found in the email, they are then directed to a festively designed version of the website that features a personal birthday message for them. This resulted in not only a better user experience but also a higher rate of sales conversions based on the offered special discounts.

Example 3 – Adding a unique message to women, arriving from a dedicated Facebook Ads campaign

A ticket office employs the use of an ad targeted to married women on Facebook Ads in preparation for an upcoming stand-up show. When directed to the ticket office’s website through this campaign, users will be greeted with a message (and even a personalized design with the power of the If-So WordPress plugin) that prompts women to action: “If you’ll wait for your husband to do it it will never happen. Order now.”

This humourous UTM based content properly conveyed the tone of the standup show itself and spoke to the women it was targeted to. This resulted in an increase in ticket sales and it was all thanks to the implementation of content based on UTM parameters.

  • Was this Helpful ?
  • YesNo

If-So 1.4.2: Import and export triggers, an easier way to edit triggers, and more…

Import and Export triggers from one property to another, or just save them on your drive for future projects

We value your time! The new Export & Import option allows you to save triggers and implement them on other web properties.

To export a trigger, simply go to the “All Triggers” list and hover over a trigger, then click the “Export” button. A file with the same name will be automatically downloaded to your PC.

Export Trigger Button Circled

To import the downloaded trigger press the “+ Import trigger” button on the top of the “All Triggers” list. The trigger will be uploaded as a draft version that you can edit and publish anytime.

Import Trigger Button Circled

“All Triggers” modal on page and post editor

Implement your ideas for dynamic content on-the-go! A new button that opens a modal box with a list of all your triggers was added to the top of the classic editor. Use this modal to edit or add a new trigger without having to open a new browser tab or exit the page you are editing.

Dynamic Content Button on Edit Post Page

This will save you time spent entering the plugin menu, searching for the needed shortcode and then opening the editor once more. At the moment the feature is only available for the Classic WP Editor, but we are working on making it compatible with Gutenberg, Elementor, Divi and other page builders.

Implement If-So on your website right now and raise the productivity of your pages for free.

Related Articles

The Impact of Dynamic Content on SEO – Best Practices and Potential Risks You Should Know

Google encourages constructive testing and ongoing optimization efforts for every website owner and marketer. As John Mueller, Google’s Webmaster Trends Analyst, had this to say in a Reddit AMA:

“Personalization is fine, sometimes it can make a lot of sense.”
John Mueller, Google’s Webmaster Trends Analyst

It should be noted, that while Google is a proponent of efforts to improve the overall experience of each customer and transform websites for the better, in a technical sense, there are some guidelines to follow in order to properly utilize dynamic content. These guidelines should be kept in mind during each and every effort to optimize and personalize web pages so that you can reap the fullest benefits of dynamic content!

Dynamic Content Contributes to SEO Success!

Dynamic content (aka adaptive content) refers to web content that changes based on the behavior, preferences, and interests of the user. As such, it is much more efficient in delivering a higher standard of quality than typical, static content.

Higher-quality content creates a very positive snowball effect as it improves the overall user experience which, in turn, improves Google organic rankings. Where static content remains the same regardless of a user’s unique interests, dynamic content delivers the types of content that each particular user is most likely to enjoy. This plays a key role in producing more user engagement, returning user visits, an increase in the average time spent on your site and, ultimately, an increase in sales and conversions.

Potential Risks of Dynamic Content on SEO and How to Avoid Them

It is evident that the use of dynamic content can play a dramatically important role in your search engine optimization efforts overall. Nevertheless, when making use of dynamic content, you utilize different versions of web content to offer each of your users a personalized experience. The question that arises is which version search engines, like Google, will see when crawling your website. Questioning even further, will the same version of the content be displayed to search engines on each crawl?

From a technical point of view, there are five main risks that need to be taken into consideration when using dynamic content:

  1. Cloaking
  2. Duplications
  3. Keyword cannibalization
  4. Page load speed
  5. Redirection

To give you the truest understanding of dynamic content and how to use it in a way that aids your SEO efforts rather than hinders them, let’s explore the five risks. In doing so, you will have all of the necessary information to use dynamic content to your full advantage!

Risk #1: Cloaking

What is Cloaking

As it turns out, cloaking is essentially exactly what it sounds like: displaying content to your users that differs from what Googlebot is shown. Cloaking is an incredibly high-risk behavior when it comes to dynamic content creation as it is a big no-no when it comes to Google’s quality guidelines.

With cloaking being strictly against Google’s quality guidelines and presenting a terrible user experience to visitors of your site, it’s obvious that your website could be subject to serious consequences if Google catches on. Both a breach of quality guidelines and a consistently poor user experience indicated by low user engagement/high bounce rate are surefire ways of destroying your rankings.

How to Avoid Cloaking While Using Dynamic Content

Googlebot expects to view the same content that any average visitor to your webpage would see. In order to ensure that your content is displayed to Googlebot appropriately, there are 3 steps you should follow:

  1. Make sure that your site displays enough non-personalized, static content, to assist Googlebot in determining the relevancy of the webpage so that it can route queries accordingly.
  2. Make the dynamic parts of the page minimal as possible
  3. Keep your titles static, especially H1s. If you do turn your title to dynamic ones, make sure to include the focused keyword on each version and make sure the meaning of the title is not completely different on each version

Risk #2: Duplications

What is duplicated content and how to avoid it

While duplicate content is unlikely to earn you a penalty from Google, it can be hugely impactful to your website’s overall quality score- and not in a good way. It is easy to see where the problem lies in this situation as your Google ranking is based around a number of determining factors with one of the largest being your site’s quality score.

Duplicate content can be defined as multiple webpages that lack any significant change (or any distinguishable changes at all) when Googlebot indexes them. Whether the creation of duplicate content can be attributed to a reposting of the content elsewhere on the web or a rewriting of the original content, Google isn’t a fan.

How to Avoid Duplication While Using Dynamic Content

Of the five potential risks that dynamic content can pose, the creation of duplicate content is one of the easiest mistakes to make. With that being said, duplicate content is also one of the easiest risks to avoid.

Duplicated content might be created while using query strings (URL parameters). As default Google and other search bots relate to URL with a query string as a different URL. Meaning the URL example.com and the URL example.com?color=red are two different URLs (though on the website’s admin side only one page exists).

Avoiding duplicate content is done by applying canonical tags. Canonical tags indicate to search engines that certain pages should be treated as copies of a certain URL and that any rankings should actually be credited to the original page.

Risk #3: Keyword Cannibalization

What is keyword canibalization

Keyword cannibalization is a problem that lies in relatively the same vein as a duplicate content. Keyword cannibalization can be defined as query strings that generate a large number of webpages that target the same keyword or keyword phrase. When your site consists of multiple pages that are all competing for a top spot in the rankings of a singular keyword or keyword phrase, they basically “eat” each other up in the process.

When it comes to the use of dynamic content in your SEO practices, keyword cannibalization can prove damaging as you will be inhibiting the webpage you would most prefer to rank well for a keyword to effectively compete. In fact, you are essentially competing with yourself.

How to Avoid Keyword Cannibalization While Using Dynamic Content

As the reason for keyword cannibalization is similar to content duplications, the solution is also the same – applying canonical tags (as described above).

Risk #4: Page Load Speed

the affect of Page load time on SEO

When a customer’s search for a particular subject is halted for more than 2-3 seconds due to slow page load speed, they are likely to move on and never return to that site. This highlights the importance of optimizing your web page for page load speed. Every effort should be made to ensure that your site loads quickly and gives the user what they’re looking for.

When a user bounces off of your page due to an unsatisfactory page load speed, this essentially tells Google that you are undeserving of ranking for those important search queries. After all, a bad page load speed means bad user experience.

How to Avoid Slow Page Load Speed While Using Dynamic Content

Though there is no way to avoid long page load times when you add an extra capability like dynamic content, some plugins or software may be more effective than others. Naturally, the preferred option is to use a service like If-So dynamic content that processes the dynamic content on your server, without requiring calls to an external server.

Risk #5: Redirection

How Redirection  affects SEO

Redirection occurs when you create a response status code that is triggered whenever a visitor attempts to view content that has been relocated to a different URL. Redirection may be used in a variety of situations including split testing, for example.

There are two methods to create redirections are by JavaScript or by using an HTTP response.

How to Properly Create Redirections While Using Dynamic Content

Google’s guidelines for redirection clearly state that either a JavaScript-based redirect or a temporary HTTP response status code known as “302 Found” be used when redirecting users. This will be effective in communicating to Google that this redirection is only temporary and that the content’s original URL should be indexed as opposed to the temporary redirecting source. This will minimize the chances of both duplicate content and keyword cannibalization which is, as you now understand, very important when using dynamic content.

Conclusion – Guidelines for Using Dynamic Content without Causing SEO Issues

Always make a conscious effort to take the necessary precautions that can provide you with a safeguard against the unfortunate, potential risks of dynamic content on SEO.

The article specifies seven useful guidelines effectively avoid the repercussions associated with the five SEO vulnerabilities of dynamic content:

  1. Make sure that your site displays enough non-personalized, static content, to assist Googlebot in determining the relevancy of the webpage so that it can route queries accordingly.
  2. Make the dynamic parts of the page as minimal as possible.
  3. Keep your titles static, especially H1s. If you do turn your title to dynamic ones, make sure to include the focused keyword on each version and make sure the meaning of the title is not completely different on each version.
  4. Remember, Googlebot expects to view the same content that any average visitor to your webpage would see.
  5. If you redirect users to a different page – always use 302 redirects
  6. Always apply canonical tags if you are using URL parameters or if you redirect some users to a different page
  7. Use an on-site dynamic content service. Make sure the service you use doesn’t slow down the page load speed drastically.

When your rankings skyrocket thanks to the improved user experience that dynamic content provides, you’ll be glad you knew what you were doing!

FAQ – Which If-So version do search engines crawl?

If-So is a server-side solution. Conditions are checked when a page with dynamic content is loaded, and content is displayed accordingly. Only one version of the content is rendered (loaded). Learn more.

  • Was this Helpful ?
  • YesNo

New release: UTM-based content, shortcode usage in titles, DKI, and more

A New Condition – Add or replace content according to UTMs

You asked for it, here it is! The UTM condition allows you to add or replace content according to UTM parameters: source, medium, campaign, term, and content.

If you are already using UTMs, this new condition is perfect for you. If not, it’s time to start! You get a two in one deal – Tracking the performance of different audiences, and providing the audience with a personalized content experience.

For example, you create an email campaign and want to offer a special promotion. You then add UTM parameters to all the links on your mail (i.e. yourdomain.com?source=newsleter….). The UTMs allow you to segment your analytics reports to track the behavior of users arriving through your emails. With the new If-So UTM condition, you can now be based on the same UTMs, and also display a special promotion banner that will only be visible to users arriving through this email.

There is no limit to what you can do! You can make a Facebook campaign to a specific gender, or different age groups only and customize key content on your landing page accordingly. You can use the condition to show unique offers to users arriving from your Google remarketing campaign and more…

Learn more about the UTM condition

More free stuff!

The IP and Start and End Date conditions are now available for use completely free of charge! These new conditions join the Device Type, Logged-in Users, Geolocation (250 monthly sessions) and Referral Source conditions which were already free

The License Key is now hidden

A screenshot of the license field showing that the license is hidden

Until today, when web developers and marketing agencies activated the License Key on customers’ websites, the license was visible to the customer. From now on, the license key will be hidden and safe. Not the customers nor third parties who have access to the site can use the license on a different website.

Use If-So on pages and posts titles

The true power of If-So is that it lets you personalize specific elements on your site. Choosing the right elements will maximize results while keeping the effort invested minimal. Titles are probably one of the most effective elements driving visitors into action. As a default, WordPress does not support using shortcodes in page titles. A new option that was added to the plugin’s settings changes that.

A screenshot fro the plugin's settings showing the "allow shortcodes in the title" option.

Duplicate triggers

A duplicate button was added below each trigger on the “All triggers” page. Thank us later if you need to create several triggers with similar condition 🙂

Disable the Pages Visited cookie

Users who don’t use the Pages Visited condition but are concerned about privacy regulations can disable the pages visited cookie. If the cookie is disabled, If-So will skip dynamic content versions with the Pages Visited condition (the next versions, if such exist, will be checked as usual).

A screenshot showing the option to disable the pages visited cookie

Recurrence override

The recurrence option allows you to control the consistency of a user’s experience. Once a user has visited the website and saw a certain dynamic version, the same version will be displayed every time they return to the website.

The ‘Recurrence Override’ feature allows you to choose versions that will override other versions that should have been displayed due to recurrence (in case their condition is met).

If-So DKI (Dynamic Keyword Insertion)

If-So Dynamic Keyword Insertion lets you insert keywords related to your If-So conditions into your webpages using a simple shortcode.

With If-So DKI you can display:

  • The user’s location: country, state, city, or continent
  • The user’s time zone
  • The referrer source
  • The browser language

For example: Let’s say you are selling a product and you offer free shipping to Europe, and you want to display the content “Free shipping to {Country name}”. Instead of creating a content version for each country in Europe, now you can create just one version, targeted to Europe using the Geolocation condition. All you need to do is to set the content as follows: “Free shipping to United States.” The shortcode will be replaced with the country’s name when the page is rendered.

Click here to read more about If-So DKI and the available shortcodes.

Page Caching Compatibility for Dynamic Content

Update! From version 1.5.0 If-So is fully compatible with page caching, allowing you to load the dynamic content using an Ajax request after the page loads from the cache. Learn more.

Both page caching compatibility and dynamic content are powerful tools that may help to increase conversions, reduce bounce rate, and improve the overall user experience of your site.

However, it’s important to know that if you are planning to use dynamic content and caching simultaneously, you might encounter issues. Being aware of how exactly caching works, why and when it’s useful, and of the potential conflict between the two, will allow you to enjoy the benefits of them both and ensure a seamless, optimized experience.

What Is Caching?

By definition, page caching is the process of storing copies of files in a cache, or temporary storage location, so that they can be accessed more quickly. Specifically, when it comes to websites caching; every time someone visits a web page, the server has to perform multiple calculations, processing, and requests to serve up the content to the user. Caching helps to reduce or eliminate much of this processing by “remembering” the output of a page so that pages load faster.

The benefits of website caching are clear:

  • Faster page load to decrease bounce rates and increase conversions
  • Less work for the host server (important for limited hosting plans)

From a broader perspective, caching improves the overall user experience. In turn, this decreases bounce rate, increases conversions and helps your site rank higher in organic search.

Types of caching

There are two types of caching: browser-side caching and server-side caching.

Browser-side caching, as the name implies, is when your browser stores information about a website (static text, images, etc.) onto your computer’s hard drive, so it doesn’t have to continually process the same information.

Server-side caching is a little more compound. It includes several different protocols used by the server: Page caching, database query caching, object caching, and opcode caching. Each protocol saves specific data to the server’s memory.

In this post, we’re going to focus on page caching. This caching type is used by all popular WordPress caching plugins like W3 Total Cache, WP Rocket, WP Fastest Cache, and others. It is also the one that might cause conflict while being used simultaneously with dynamic content.

Page caching – explained in simple words

Let’s say someone asked you to divide 1,384,600 by 2300. Obviously, you don’t know the answer to this right away, so you whip out a calculator to do the math (the answer is 602, by the way). Now, if that person were to immediately ask you to divide 1,384,600 by 2300 again, you could shout out the answer right away. You’ve already done the hard work of finding the answer, and you still remember it.

Page caching works in the same way. Once a page is requested for the first time, WordPress does a lot of heavy-lifting and “calculations” to pull the text, images, frameworks, design, etc., from the database and construct the page by putting them in order. With page caching, once that process has happened for the first time, a “snapshot” of the constructed page is taken. The next time the page is requested, rather than going through the entire process from scratch, the “snapshot” is served.

An illustartions demonstarting what is page caching. Once the first visitor enters the page a "snapshot" of the rendered page is taken and served to next visitor

Page Cache and Dynamic Content – The Conflict

The problem with page caching is that sometimes, content changes. For example, let’s say the main banner of your page is yellow and a snapshot of the page was taken. Then, you decide to change the color of the banner to green. Now, the snapshot of the page with the yellow banner is inaccurate because it’s not the latest depiction. A new snapshot of the page should be taken in order to grant visitors the most up-to-date appearance.

This is a common problem when trying to create a personalized or interactive user experience. A frequent occurrence, for example, is when e-commerce sites want to display a shopping cart icon with the number of items in the cart on each web page. This icon needs to be different for every user.

An illustration showing the conflict between page caching and dynamic content. A snapshot is taken after the visit of the first user. The snapshot is served to the next visitor as it was served to the first one.

The Solution

There are two possible solutions to work around this weak point. Each has its own pros and cons.

Solution #1: Fragment caching

Fragment caching focuses on individual elements rather than complete web pages. You can choose what elements of the page to cache, and you don’t need to cache the full output – like Full Page Caching.

Though fragment caching might lead to an optimal result and lets you enjoy the benefits of both caching and dynamic content, its implementation is a little complex and will probably involve re-coding parts of your website.

Solution #2: Exclude pages with dynamic content from being cached

A quick, simple, and usually satisfying solution is disabling page caching for specific pages. Caching WordPress plugins and other caching services offered by hosting companies and CDNs allow you to disable caching on specific pages and of specific cookies. There’s no coding required.

Of course, this solution holds a trade-off between faster load speeds for those specific pages and the benefits of dynamic content. If your site is coded purely and loads extremely slowly without caching enabled, you’ll need to decide which is more important to the user experience, and figure out the best course of action.

How to exclude pages from being cached while using caching plugins

As the option to exclude pages from the cache is basic, it is offered by all caching plugins. The following is a list of popular caching plugins and direct links to relevant step-by-step guides explaining how to configure this option. If the caching plugin you are using is not listed here, you can search for the name of your plugin + exclude pages from being cached and you will likely find relevant guides.

  • Was this Helpful ?
  • YesNo

Related Articles

Track dynamic content with Google Analytics

The result you will get:

Analytics report - dynamic content
Learn how to track your dynamic content with Google Analytics:

Personalized content is great. With little effort, it increases conversion and engagement rates and can decrease bounce rates drastically. In this guide, we are going to show you an easy way to track dynamic content results using Google Analytics and Google Tag Manager.

This setup is divided into two steps:

Step 1: Create an Analytics event to track when a dynamic version is visible.
Step 2:  Segment the Analytics reports to separate the data of users who saw the dynamic content version.

Let’s Get Started!

STEP 1: Create a Google Analytics event to track when a dynamic version is visible.

To see how dynamic content affects users engagement, we first need to set up an Analytics events collection every time a dynamic version is displayed. To do this, we will first add a class and an ID to each content version. We will then ask Google Analytics to collect an event every time an element with the class is visible in the user’s browser and to name the event according to the element’s ID.

In our example, we are going to name the class “ifsoEvent” and the IDs “versionA”, “VersionB,” etc. You can choose different names if you want to.

Adding Class and ID to the content’s versions

  1. On your WordPress dashboard, go to If-So > Triggers and select the trigger you want to track with Analytics
  2. Switch the content field to HTML mode
  3. Assign the class ifsoEvent to the wrapping element of the content. Analytics will track an event every time an element with this class is visible at the browser viewport
  4. Assign an ID to the wrapping element – The ID name you set here will be the name of the event on your Analytics reports.

* If you switch the editor to text mode and you don’t see any wrapping HTML element around your content, you’ll need to wrap the text in a P tag and assign the class and ID.

You can copy and paste the following code and just replace the text “your content” with your own content.

<div class="ifsoEvent" id="versionA">Your content</div>

Hereinafter is an example showing how it should look like:

Setting up event tracking using Google Tag Manager

Creating a tag

  1. Go to your Google Tag Manager dashboard
  2. Navigate to Tags.
  3. Click New and name the tag “If-So tracking
    (The name is for your own convenience; you can choose a different name if you want).
  4. Click Tag configurations
  5. Select Google Analytics – Universal Analytics as the tag type and set up the event parameters as follows:
    – Track type: Event
    – Category: ifso_tracking (you can choose a different name if you want to)
    – Action: view
    – Label: Click the ‘+’ sign and select {{Click ID}}.
    – Non-interaction hit: TrueYour tag should look like this:
    – Under Google Analytics settings select {{Google Analytics settings}}

Creating the trigger

  1. Click the triggering box.
  2. Click the ‘+’ sign and name your trigger (we named ours ‘ifso_tracking’. You can choose a different name if you want; it’s for your own use only).
  3. Click Trigger Configuration.
  4. Choose Element Visibility as the trigger type.
  5. On the selection method field, select “CSS Selector”.
  6. 6. On the element selector field, type the class you have chosen for your element (We did it in the first step of this guide. In our example, we assigned the class “.ifsoEvent”). Make sure to write the class name with a dot at the beginning.
  7. Save! You should now hit the save button 3 times: on the trigger configurations window, the trigger container, and the tag window
  8. Click the submit button

Note that changes on Google Tag Manager are applied only after hitting the submit button!

That’s it! If you followed the steps above, the events should now appear on your Google Analytics reports.

Step 2 -Viewing results for each version on Google Analytics

After completing the steps above, events with different names will be collected every time a version is displayed. The events label is defined by the ID we assigned to the version. Next, we are going to create users segmentation on Google Analytics so that we can compare users’ behaviors based on the content version they saw.

Segment users by the content version they saw:

  1. On your Google Analytics account, go to the section you want to examine ( for example Behavior → Site Content → All Pages).
  2. On top of the Google Analytics, click +Add Segment.
  3. Click + New segment.
  4. Name the segment. For example, we named ours “versionA” but you can choose any other name; it’s for your own use only.
  5. At the side menu, click Conditions.
  6. Set up a filter as follows:
    – In the first drop-down menu, choose event label.
    – In the second, select exactly matches.
    – In the type-form, insert the version ID (in our example – “versionA”).
  7. Click Save

Voila! You’ve created a new segment that shows only users who watched version A. Repeat the last 7 steps to create segments for other content versions. Now you can track dynamic content across your entire website. Watch your conversion rates and ROI increase! 

  • Was this Helpful ?
  • YesNo

Everything You Need to Know About IP Based Geolocation

Whether you are running an e-commerce store, trying to improve your website conversion rate, decrease bounce rates, or just make your website more friendly and memorable, IP-based geolocation may be the perfect solution for you. Nevertheless, IP-based geolocation has its pros and cons. It is important to recognize these advantages and disadvantages before incorporating it into your website.

In this article, we will explain how IP-based geolocation works, the types of information you can obtain, the accuracy of IP-based geolocation, how you can use IP-to-location service on your website, and more.

What is IP Based Geolocation?

Let’s start with some of the basics. IP-based geolocation is a way that you can find the location of an internet-connected computing or mobile device. To get started, all you need is your target’s IP address, which you can obtain using a simple PHP script, and a geolocation lookup tool.

A geolocation lookup tool canvasses public databases to determine the contact and registration information for a particular IP address. With both of these tools in hand, you simply input the IP address into the geolocation lookup tool and you will receive the location of your target.

What Is An IP Address?

An IP address is an online unique identifier for every computer or internet-connected phone. The standard IP address has four or six individual numbers that are separated by a decimal.

Through IP addresses, electronic devices can connect and share data with each other. Even though every computer or internet-connected device has its own IP address (“Local IP addresses”) these IPs are rarely accessible to the outside world.

The heavy lifting is done through routers. Routers connect to individual computers, and then connect to the internet using their own IP address, also known as “External IP addresses.” The external IP address is provided by the user’s internet service provider, it is the one that actually being shared while browsing a website or otherwise acting on the internet.

Illustration of IP allocation from ARIN to an ISP and from the ISP to the user

The Geolocation Database

With an IP address, you can access a wide range of information. To reiterate, however, an IP address isn’t enough. You need to use a geolocation database to obtain this user information.

The most basic information provided in most geolocation databases includes the continent, country, state/region, city, and time zone of the electronic device. But along with this, you can discover the internet service provider (“ISP”), approximate longitude and latitude, and sometimes even the relevant organization attached to the device.

Common use cases for IP Based Geolocation

There are many different types of use cases for those who want to consider IP-based geolocation to locate online visitors. Here are a few common examples:

  • Showing different offers to users from different locations: IP based geolocation can be used to emphasize a different product to users. For example, users in one location can obtain a physical product (like a course) while other users from a more distant location can be offered a book or online course.
  • Show relevant business opening hours: IP based geolocation can show accurate business hours for a user who is in a particular country or state.
  • Providing a localized feeling: IP based geolocation can display the name of a relevant state or country in a website title in order to provide a localized feeling and attract attention.
  • Translating key messages to the user’s language: A complete translation of a site may be time-consuming, expensive and difficult to maintain. In many cases, using the user’s geolocation to translate key messages like titles and calls to action might do a great job reducing bounce rate and improving conversion rate. You can, for instance, translate key messages like titles and calls to action.
  • Redirect visitors to a page in their language: You can leverage IP based geolocation to deliver content that is more targeted and relevant.

How an IP-to-Location Service Works

While it is critical to understand the value proposition of IP-based geolocation, it is also helpful to understand some of the more technical elements of IP-based geolocation. This isn’t compulsory, but it is nice to know.

As stated above, IP-based geolocation tools obtain the location of an electronic device through the IP address. With the IP address in hand, IP-based geolocation software pulls up data about the electronic device. It does this by canvassing a database to look for matches with the inputted IP address. Because these databases are created and maintained by third parties, the location data for electronic devices depends on the company that manages that data.

A chart showing how IP based geolocation works

IP-to-Location Accuracy

IP-based geolocation services can only provide an approximate measure of geolocation accuracy. With these services, you can obtain 95 percent to 99 percent accuracy of a user’s country. IP-based geolocation services provide 55 percent to 80 percent accuracy for a user’s region or state. And they provide 50 percent to 75 percent accuracy for a user’s city.

In practice, the actual accuracy may vary from provider to provider and depending on the location of the device. For instance, IP-based geolocation services typically work better in big cities and work less well in smaller ones. Nevertheless, these IP-based geolocation services, in all likelihood, can provide enough accuracy to suit many needs.

Finally, there can be complications—especially if you are attempting to get the geolocation of a mobile device. Cell phones obtain new IP addresses as they move and cell phone providers service their users nationally. This means that it is more difficult to find an extremely precise location of a particular IP address.

Why isn’t IP-to-Location 100% accurate?

IP geolocation has been called “part art, part science” for several important reasons. First, there is no “ground truth” in IP-based geolocation that ties IP addresses to physical locations. ISPs (Internet Service Providers) assign dynamic IP addresses when users access the internet, and the precise accuracy of that location may depend on how they assign IP addresses to users.

Unvalidated registry data may lead to some inaccurate listings. Even things like inconsistent naming conventions can cause some inaccuracies—especially in cities. Challenges with latency measurements can make granular location data difficult in cities as well.

With all of these challenges in mind, however, IP-based geolocation can still deliver accurate location data. Yes, IP-based geolocation won’t deliver the most accurate location data every single time. It may not be able to provide a user’s location within one or two feet but it can still provide good enough accuracy for many needs.

Companies Providing Geolocation Databases

There are many IP geolocation database providers. While each database provider gets their IP address information from ARIN (or a different regional Internet Registry), the assignment regularly changes, as some database providers release unwanted IP addresses and others obtain new blocks of IP addresses. Along with this, there are different ways to get the data.

Some of the more popular IP geolocation database providers include IP2Location, IPligence, IP2C, DB-IP, and IP API. Most providers offer both free and paid plans, and two different ways to access the data – by downloading the database or by using an API.

Free vs Paid IP Geolocation Services

As mentioned, most geolocation database providers offer both free and paid plans. The main benefit of the free option is, quite obviously, its cost. That said, these services are usually less accurate than their paid counterparts. The free services may be appropriate if you are cost-conscious or if you are building a minimal viable product of your service. By contrast, the paid IP geolocation databases provide more accurate data and often provide dedicated support. Also, some of these paid IP geolocation databases can be quite expensive, so you will want to review potential costs before proceeding.

IP Geolocation Databases vs. Web API Services

Along with the free versus paid difference, IP geolocation database providers usually offer two different ways to access the data. You can either download the database itself or access it through an application programming interface.

Downloading the Database

The first option is downloading the database and hosting it on your server. By opting for downloading the IP geolocation database, you won’t face bandwidth restrictions as you would with an API database. You can submit as many requests as you want per day to your database, which can be especially helpful if your application requires many queries per day.

Nevertheless, there are some downsides to downloading the database. A downloaded IP geolocation database may not have as updated of a database as compared to an API database. This means that you may not have as accurate of data compared to accessing your data through an API. In addition, you may face some more technical challenges in downloading and setting up your database.

Accessing Data Through an API

One of the most significant benefits of accessing your data through an API is that the database is constantly updated. In addition, the onus is on the third-party provider to ensure that the data is available to your application. This allows you to focus on your product rather than on building and maintaining the database. There are some downsides, however. API databases may also contain some downtime, which may be inconvenient when you need the data. API databases, while they contain more updated information, may also limit the number of requests that you can make per day.

Choosing the Right Geolocation Plan

You will ultimately want to do your own due diligence, taking into account the advantages and disadvantages of each service. You will also want to account for the prices among the paid alternatives to see which service is most cost-effective for you. Each provider has different pricing methods and packages. Depending on your needs, one package may be more attractive than others. Think about what you need and which package will help you accomplish your objectives. Do not forget to consider your future needs. Applying the solution requires some technical work and you don’t want to waste time replacing providers as you grow.

Unless your site is a WordPress site and you choose to use a plugin that will do the technical work for you, whichever path you choose, you will need to have some knowledge of coding in order to implement a geolocation IP database. If you do not have this knowledge, you will need to rely on someone for help—whether that person is on your team or is a freelancer. While it may not be cost-prohibitive, this is another step that you will need to take in order to leverage a geolocation IP database for your website.

An alternative to detect the users’ location – the Geolocation API (HTML5)

Another way to access a user’s location is through a geolocation API. This is an HTML5 feature that lets a user share their location information with you. You have probably seen this feature when browsing the internet. You are shown an alert asking whether you want to share your location with a website. The decision is entirely at your discretion.

The Geolocation API (HTML5)

An advantage of the geolocation API is that it is automatically included in HTML5. However, there are some disadvantages. The main disadvantage is that you won’t be able to get a user’s location if they choose not to share it with you. This means that you won’t be able to access some of the key benefits of geolocation, like presenting personalized content to a user on his first visit. Along with this, the geolocation API only works on secure servers and it is not supported by certain browsers (like Internet Explorer 10 and below or OperaMini).

Using If-So WordPress Plugin to Display Website Content According to the User’s Location – No coding required

If-So Dynamic Content is a WordPress plugin that lets you leverage IP-based geolocation for your own website. The plugin does not require any coding—all you need to do is select the geolocation condition and set the content to display to users from targeted locations. You can try If-So’s geolocation completely for free. Setting it up takes less than 2 minutes.

Related Articles